|
Day 25 of NaMoPaiMo & Kim & Angel are still hard at work! Kim had a little set back on wings today, they just weren't meeting with her approval. 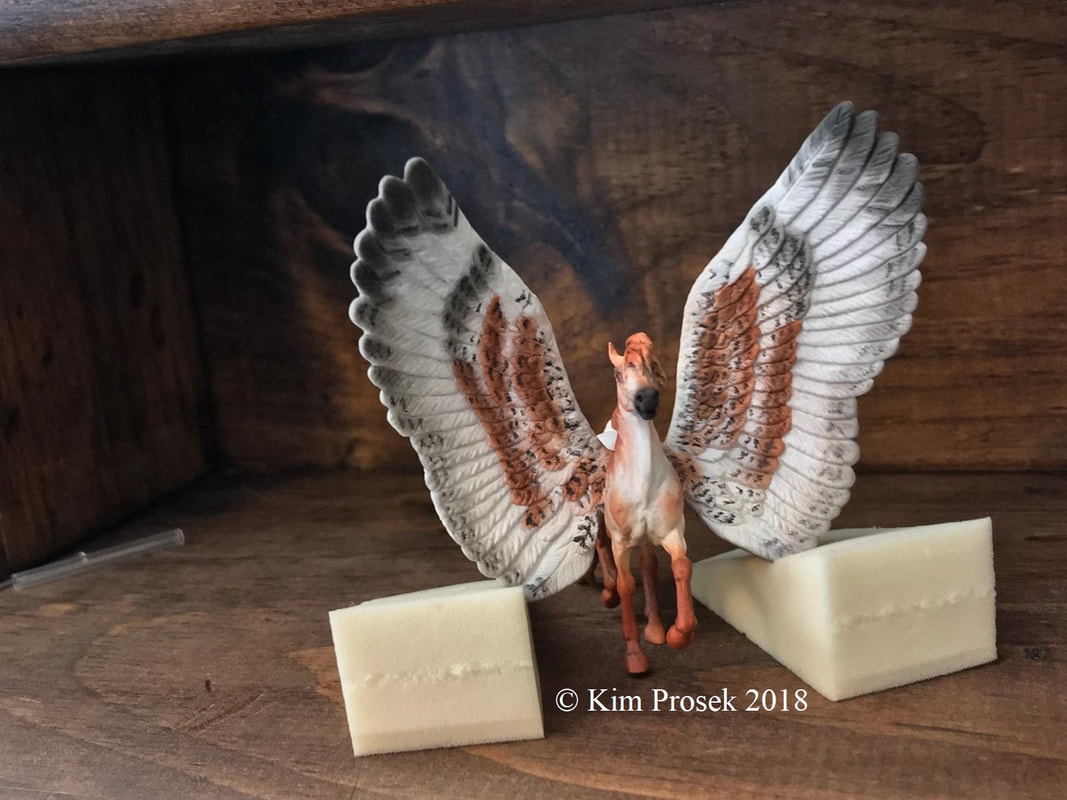 So they were whited out & started over. 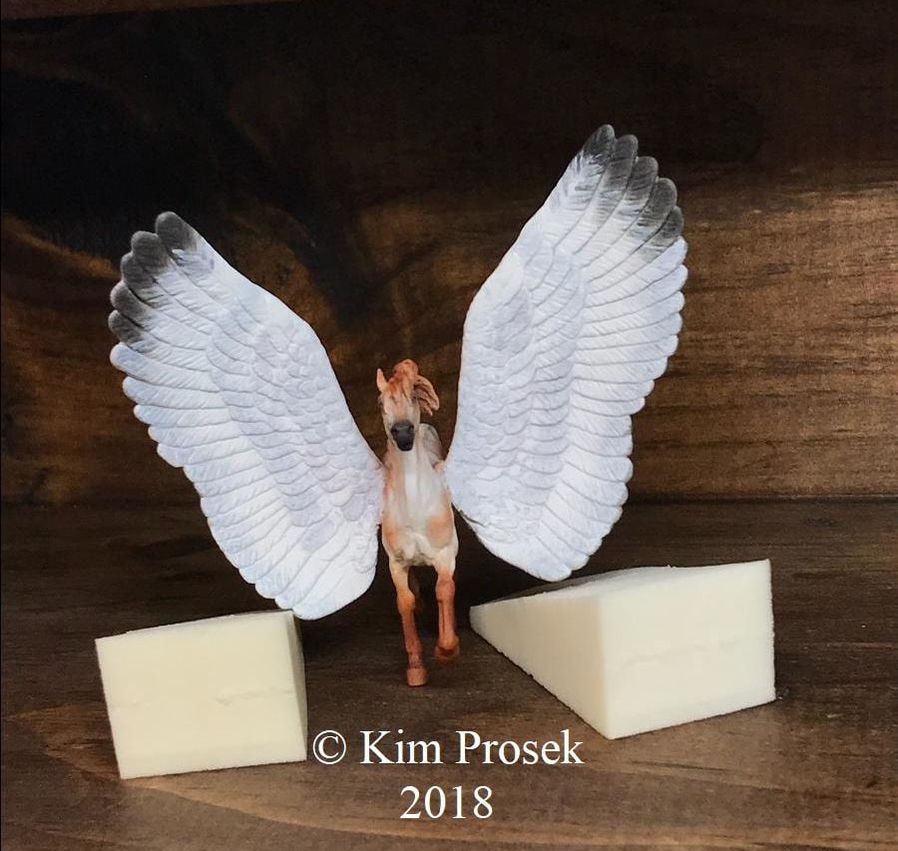 But she's much happier with the second try! I believe that she now just has details to go on her!  Angel has had good progress too! She's done fiddling with CMing & has been air brushing the base on her Gypsy! She's never air brushed before NaMoPaiMo! Kudos to her for trying something new!  She's also been having fun running with the inspiration that NaMoPaiMo has brought on & painted a couple SMs too! 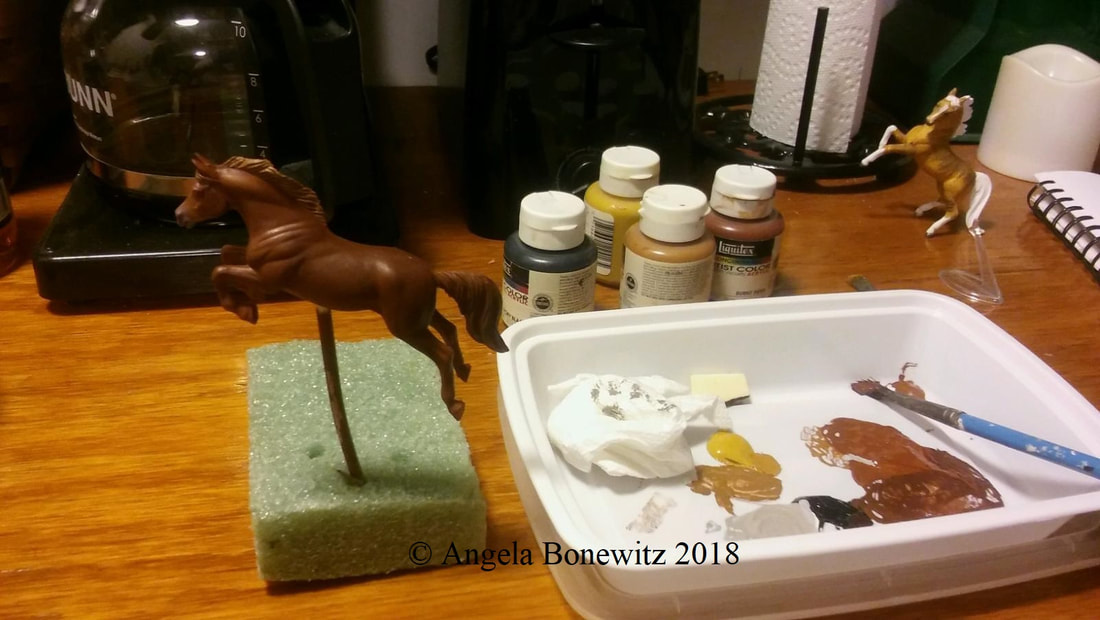 Carole's still showing us all up. ;) 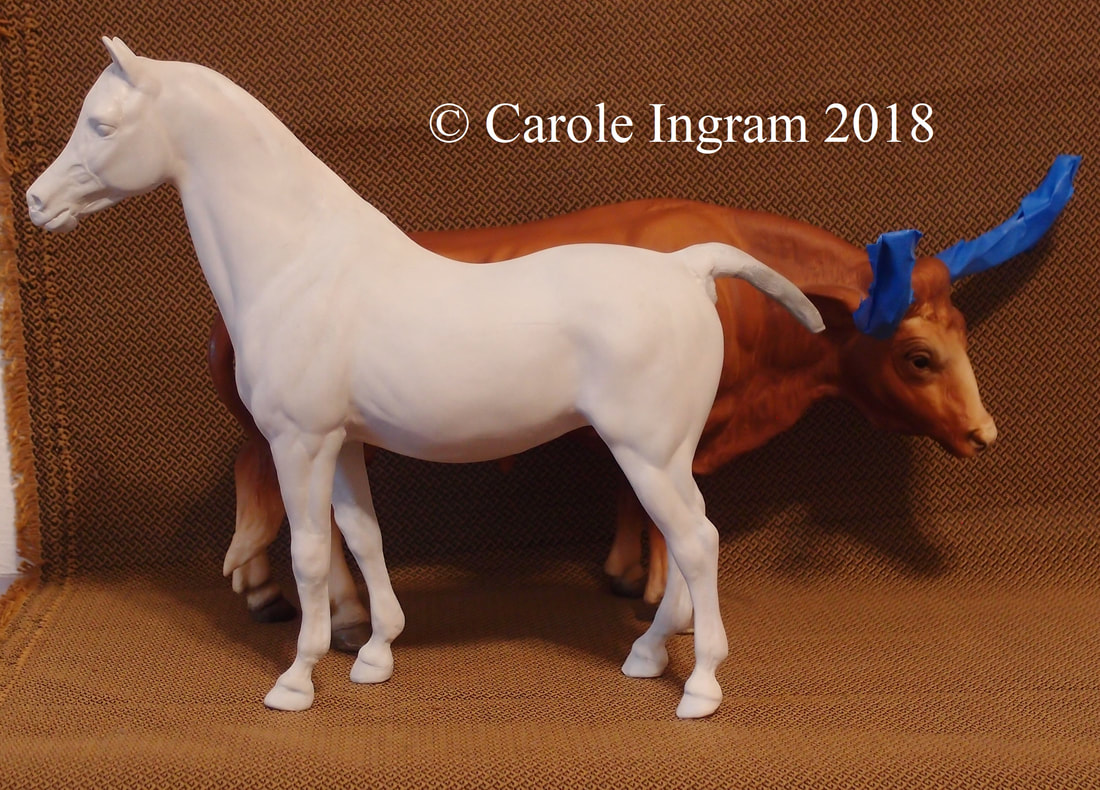 Me? Oh, well, um, I, haven't done anything with Nocturno this weekend. What have I been doing? Everything else! As usual I have a whole herd that is calling. Plus an experiment that I've been dyeing to try. Today I broke new ground for myself & tried my hand at molding something for the first time ever. I made this medallion last week just for this endeavor. 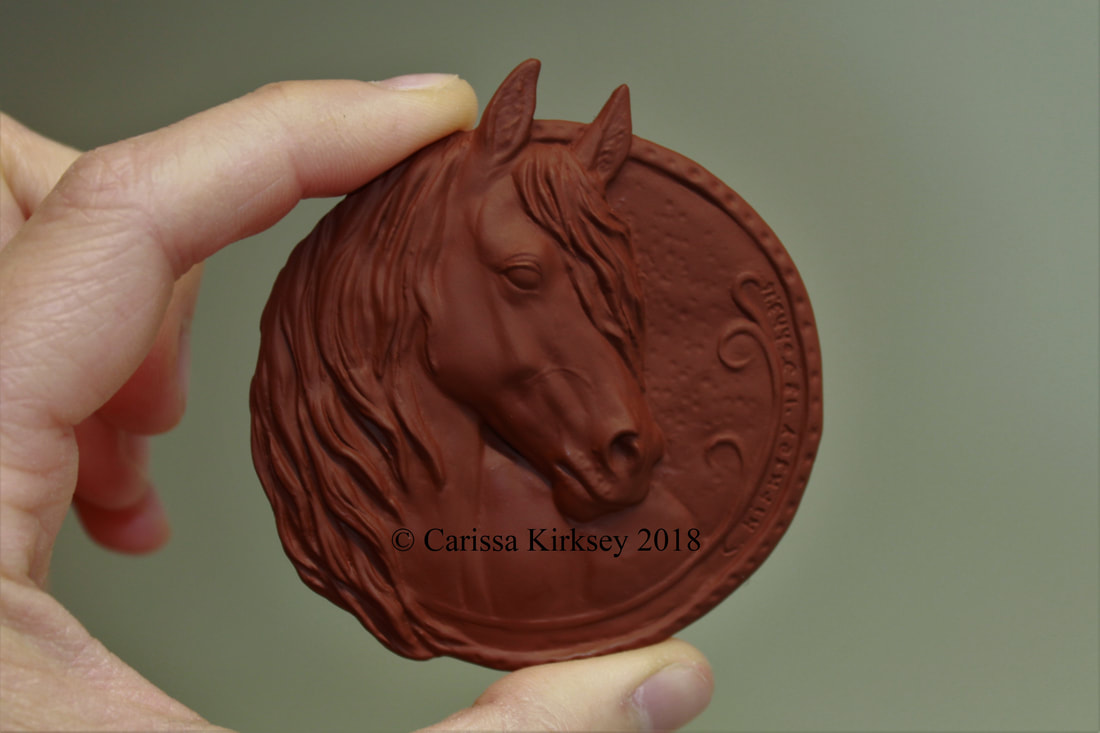 Built my first ever mold box. 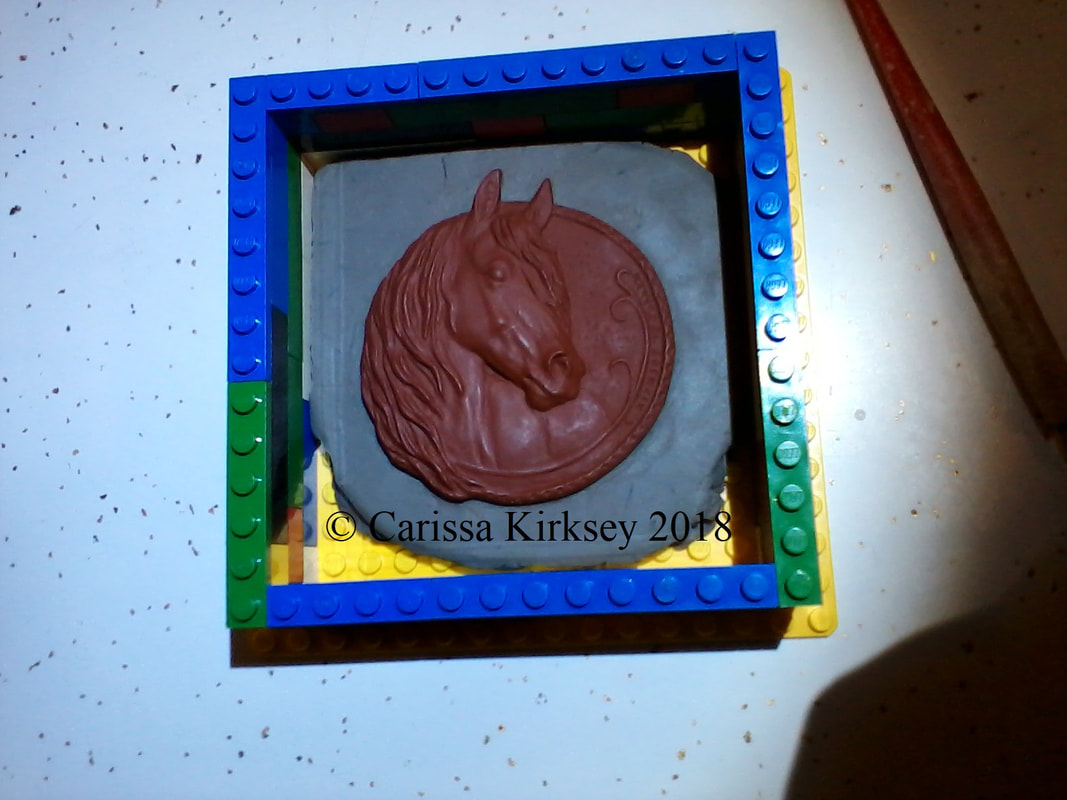 & mixed & poured my first ever silicone. 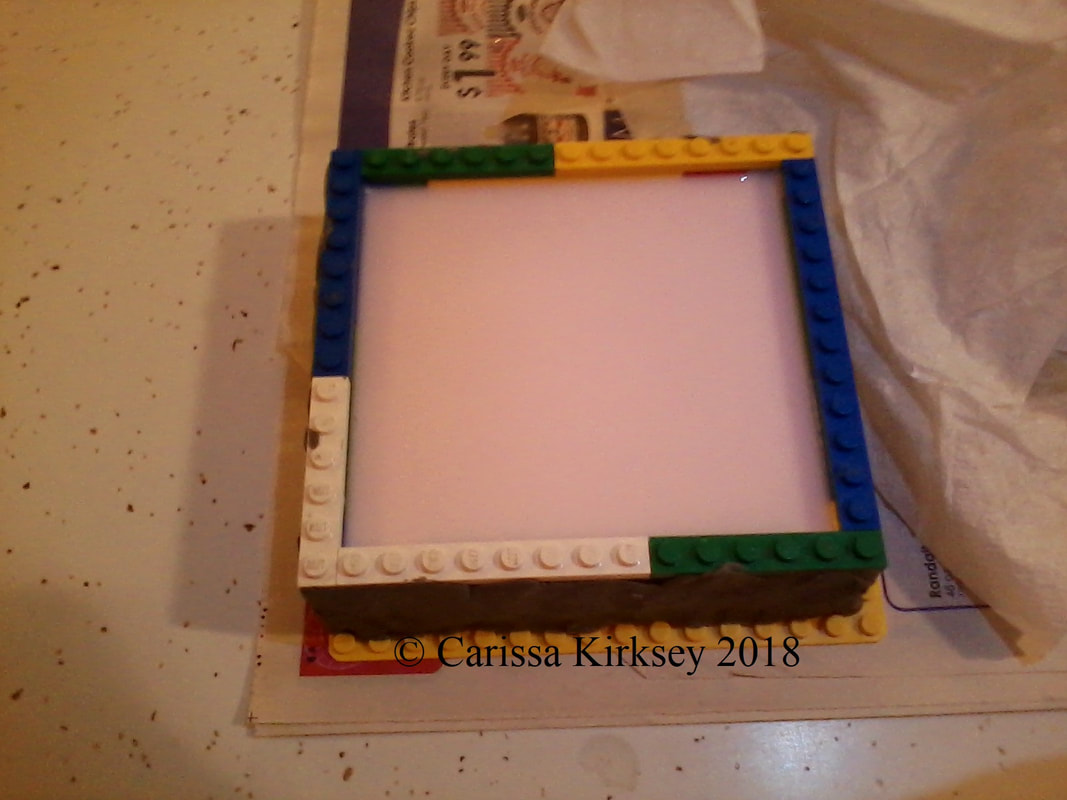 You have no idea how much I want to pull it apart & see if it worked or not. Morning can't come fast enough!
There are still three more days in NaMoPaiMo, we still have hope, right Nocturno? {:| Happy painting all!! One week to go in NaMoPaiMo! I have been neglecting my blog, but things are still moving, albeit slowly, for us all! My Nocturno is still working on dapples. ...My my but we had go rounds on them! He was fighting me tooth & nail about them. But eventually, after the fifth try, I got them going how I wanted! I still have more to do on the other side before I can move onto the next step. *sigh* No matter how you do them, dapples are time consuming!! Alas, I do have other horses to work on too, so he has been getting my in-between time, poor boy.  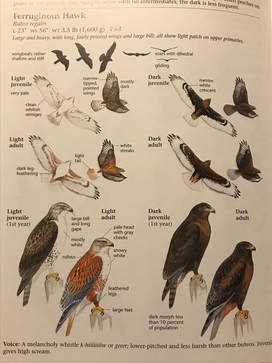 Kim, likewise, has been picking at her NaMo Pegasus, but has other horses that have taken priority on being finished. "This past week (Feb 12th) has involved me frantically painting and finishing another MM for an upcoming show next month. This will be my first show ever! And Carissa has kindly agreed to proxy for me. :) Now that I have everybody done (well, almost) I can turn my attention to Furia. I am planning on painting her similar to the light morph hawk in the picture. This reference comes from The Sibley Guide to Birds. It’s an awesome book that is illustrated by the author, David Allen Sibley. Cross your fingers that Furia cooperates!" Fingers crossed, Kim! I think she looks good so far though! Can't wait to see what ponies you send me to show too! Angel is still CMing her Shire-turned-Gypsy, but after a bit of a shaky start with sculpting, she's finally getting to the point of being pretty happy with him! She's still picking on the tail, so he may be a NaMoPaiMARCH pony. ;) I know I would prefer to be late but happy with my model, than finish in the month & forever dislike something about him, & I think that is how she is looking at it now too. :) Carole, on the other hand, is still showing us all up. ;) She's sold her NaMo PAM, who was finished earlier, & has gone onto paint two medallions for herself! I think they look lovely!! Wish us luck in this last week! We're still plodding along!
Happy painting all! "I Did It" has become the triumphant cry of NaMoPaiMo when one finishes their chosen horse within the month of February. & it should be no surprise that Carole is the first of us four to be able to say that! ...Eventually! "Thought I was done. Then saw where she fell over during spraying. Didn't notice until photos as I don't wear glasses outside for spraying. Working on repairs now. Grrrr" "I did play dress up before I saw her boo boo. She is a fun mare." A Little later she had this update: "It seems to be coming along OK. Just to show we can work through problems." Shortly followed by: "She wasn't real hard to fix. The scratches were easy with pigments. The little ding was harder as it went to base and was like a chip. So I had to carefully use a little acrylics to build it back up. Tried to keep it close to same color and then pigments to blend. I think it is unnoticeable now. The little brat..." Because of her disobedience, PAM's final finished pictured were without background, but still beautiful! Congratulations, Carole!! Angel, on the othe hand, is having a little harder time though. Yesterday he finally had a tail again.  But when it came to sculpting some extra hair she said that she wasn't feeling as confident as she had been. You can do it Angel!!
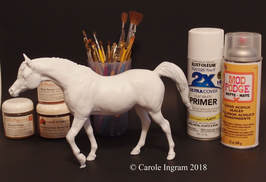
As for my Nocturno... Not much. I washed off the dapples I did the other day & haven't gotten around to doing them again! Other horses have been getting my attention. I always have a herd of WIPs. Stay tuned for more later! Cheers all! The very start of painting a horse in just about any medium is usually a good base coat of acrylics. As a prelude to my article on painting in oils, here is a little on how I do base coats. A side note before we get to the info here though. I do not have an air brush (though I hope to get one sometime this year), I lay basecoats entirely by hand & have for years. With that in mind, this mix may not be good for an airbrush, I really have no idea! Just wanted to toss that out there before someone makes their airbrush unhappy! On with the tutorial! Since Nocturno is going to be a rich dark bay, his base color is a mix of burnt sienna acrylic & clear gesso, thinned with water. You will want to pick or mix a base color as close to the body, or middle color, of your chosen finishwork color. 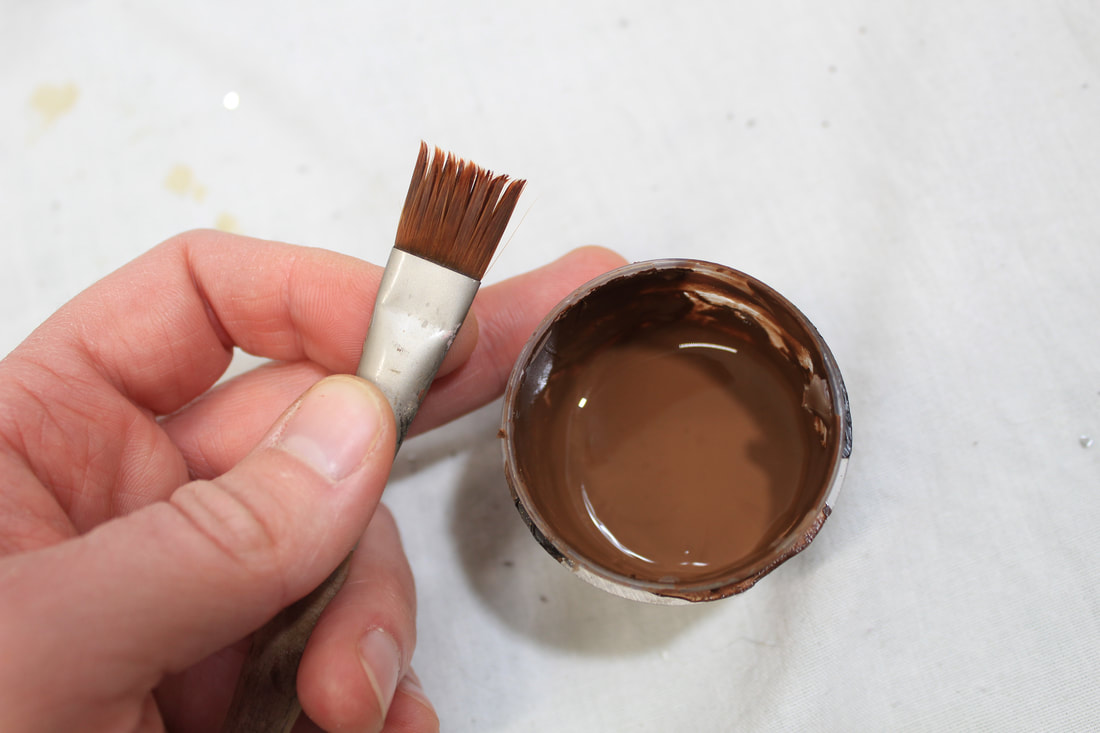 I started with this brush (which is rinsed & wet in this pic actually), but switched to a similar one later as this one was a little too frizzy & was leaving streaks in the basework. Like all of my paints, I mix in bulk to have it when I need it, so I do not have pictures of mixing the base I used on Nocturno. But I did take pictures of another color of base that I mixed not too long ago. The motions are the same no matter what color the base is. You will need: * Acrylic in the color or colors desired * Clear Gesso (I use Liquitex Professional) * Water * A sealable container * A stir of some sort (I use a popsicle stick). 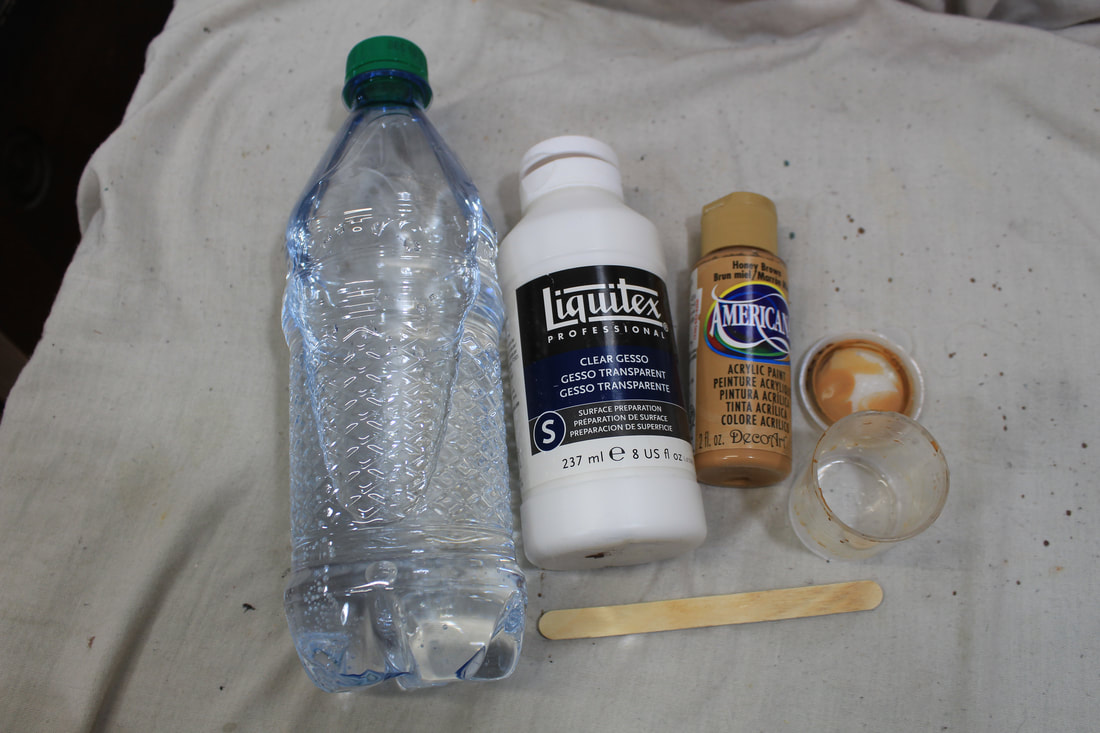 Add however much acrylic you need to your container. This "Honey Brown" is one of my staple base colors which I had run out of. I had washed out its container to reuse & it was still a little wet which is what the swirls in the paint are.  Add a good bit of clear gesso, but do it somewhat cautiously; The gesso is to add 'tooth' for the oils to grab onto, as well as to add a little more sandability (yes spell check that is the word I mean!) if you need to knock down imperfections in your base or something missed in prepping. But, if you add too much it will leave you with a sandy texture that will show in your finishwork. (Really bad if you use pastel as that sandy texture will 'pop' with the pastel catching it.) 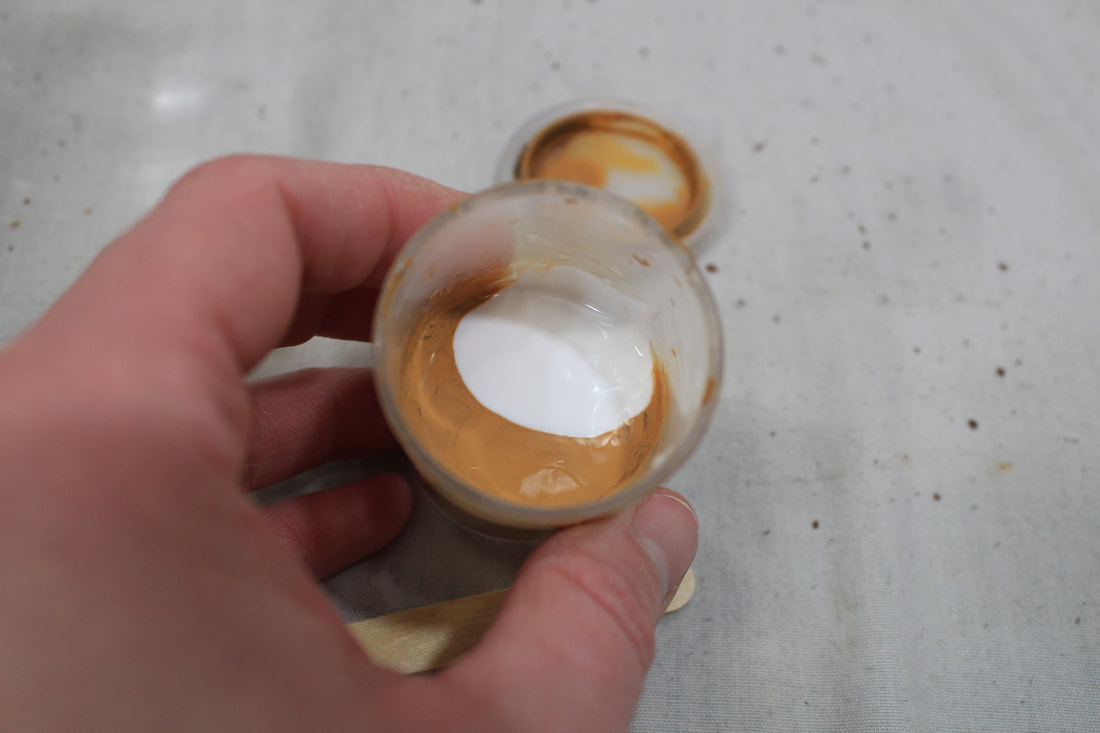 It looks white, but trust me, it is clear. You can't see in the picture of supplies, but I paint the cap of the clear gesso bright red so I never mistake bottles & grab white when I meant clear! Mix...  & add water. 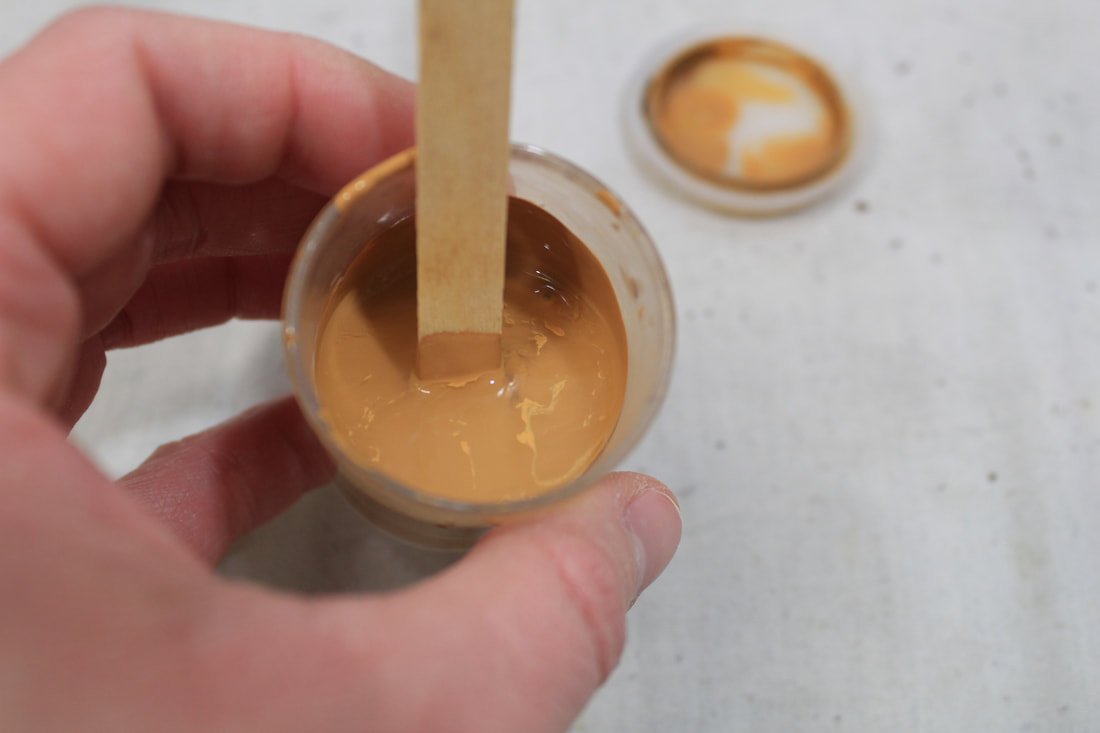 You want to thin it down to a consistency so that it will just cover the side of the container without beading up. It's something of a learned skill to determine how far to thin it... 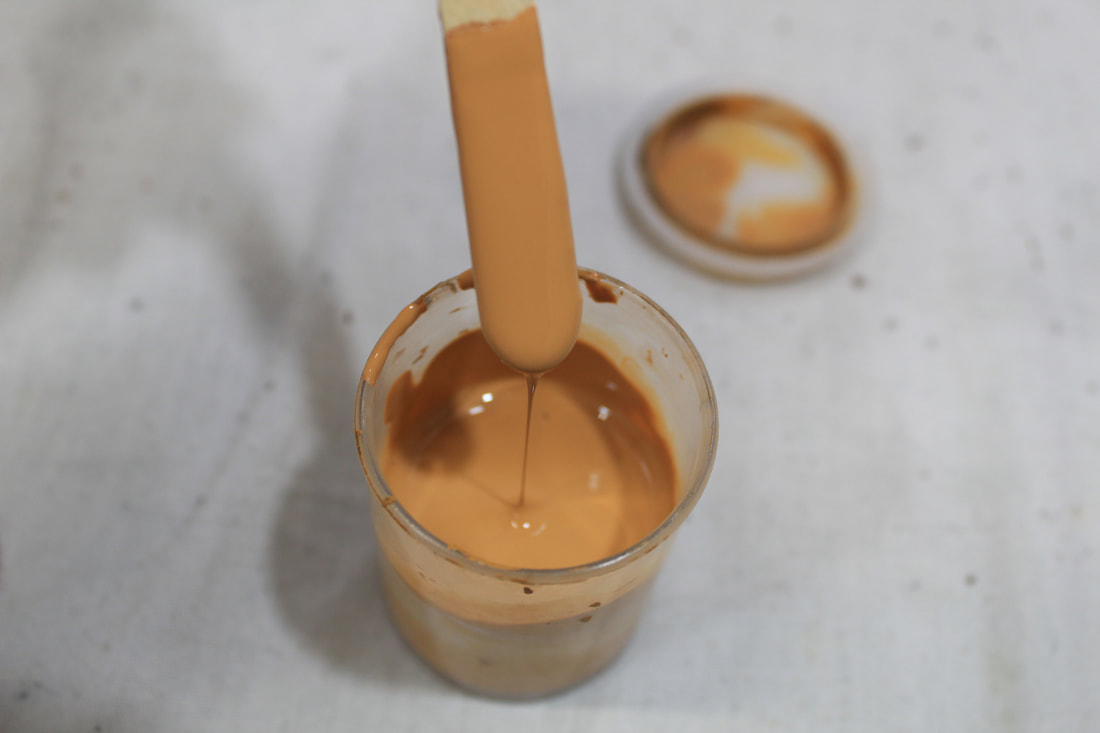 But as long as you are not leaving brushstrokes on your horse, you are probably good! If you start painting it on & think that the paint is a little too thick, you can always water it down more. With a prepped & primed horse (taking off seams, logos, imperfections, etc. & giving it a good coat of spray primer), you can start brushing on your base. Nocturno was primed in Rust-Oleum Painter's Touch 2X Coverage flat red primer, which was really close to my base color! Made my work easier! If you are starting a light base color, white is a better choice, you won't have to fight the stronger color under it, saving you layers of painting base. In the picture below, the first layer has been laid down on his head, neck, shoulders, & first half of his barrel. It takes many layers to completely finish a good base coat. 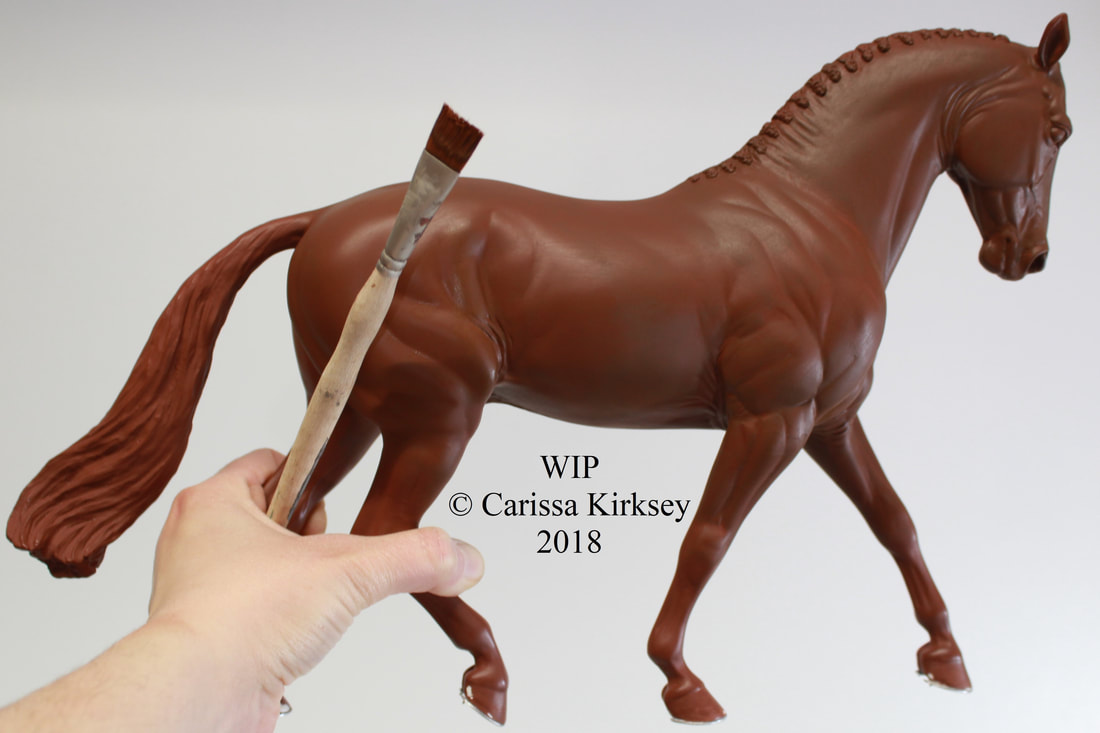 With a half inch flat (that isn't frizzed up!), dip the very tip into your base paint & attack your horse! Brush it over the surface, being careful not to leave brushstrokes. A way to help avoid brushstrokes is to not load more paint onto your brush than you can smooth out before it starts drying, & acrylics dry super fast! Also, brush in many different directions to help avoid building up any brushstrokes & ridges. If you do get a ridge, you might be able to smooth it out gently with your finger while the paint it still wet/damp; be careful not to rub a hole in your base coat though! The safest solution to ridges is to wait for the base to totally dry & hit it with a light touch of 220 or finer sandpaper. That's where the gesso comes in handy! Straight acrylic likes to tear & peal when sanded, but the gesso allows it to be sanded. I start basing at the head & work my way back, usually leaving the tail for a hand hold. If your chosen model does not have a tail suitable for a handle, you have to improvise, using legs which will have to 'catch up' to the painting at every step. Since Nocturno is going to be bay & thus his legs are going to be black, I didn't bother basing them & can use them for a hand hold too. Usually when I a basing, by the time I have gotten to the rear of the horse, the head is has dried & I can start over again. Don't get frustrated if your base looks really splotchy, you need to build up many layers to keep from getting brushstrokes, so this it totally normal for it to look horrible! Just take a look at 'Rastus' between the first few layers & the final result. 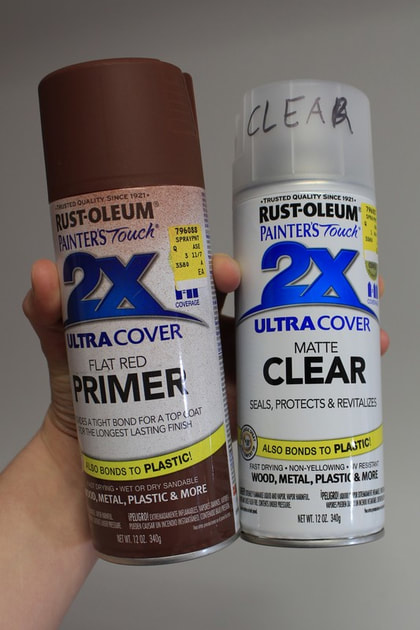 Here is the red primer I used on Nocturno, & the finish I usually use on bases. "CLEAR" is written on the cap because it looks WAAAY to much like white primer at a glance & I don't want to grab it by mistake! Here is the red primer I used on Nocturno, & the finish I usually use on bases. "CLEAR" is written on the cap because it looks WAAAY to much like white primer at a glance & I don't want to grab it by mistake! TIP: Quite often I will spray a layer of finish over my base layers at some point to help avoid any of the base wearing off & leaving a 'hole' to fill, which is fixable, but annoying. I usually use Rust-Oleum Painter's Touch 2X Coverage matte for this, but any finish should work just fine! Make sure you no longer have ANY thin spots in your base; if you move onto painting while there are some weak areas in the base, I guarantee that you will see them in the finished horse, so make double sure to catch them all! Once the base is absolutely solid you are ready to move on to actual painting! It's really hard to tell, but here was Nocturno when his base was finished. 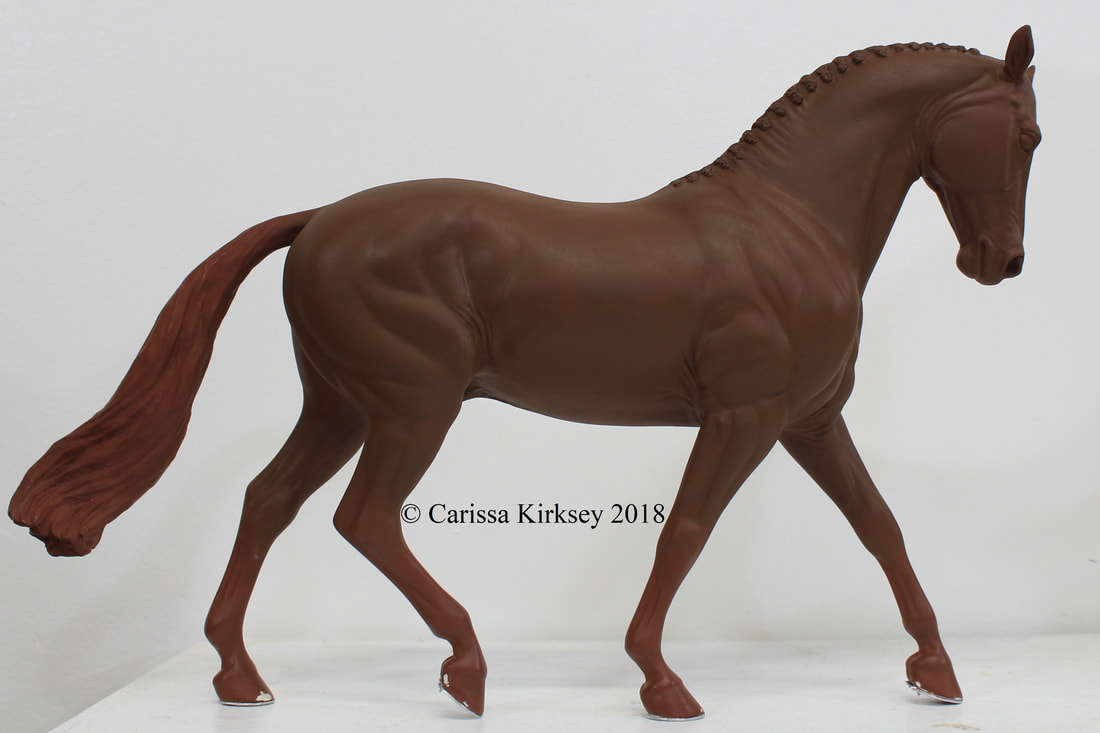 Check back later for a tutorial on how to paint bay with oils next!
Happy painting all! Not a whole lot was accomplished in the way of NaMoPaiMo for me today. Other models were calling, so I did not do much to Nocturno, or any writing at all. I did start to add dapples in pastel, but I'm not sure if I like them. They look too small to me. 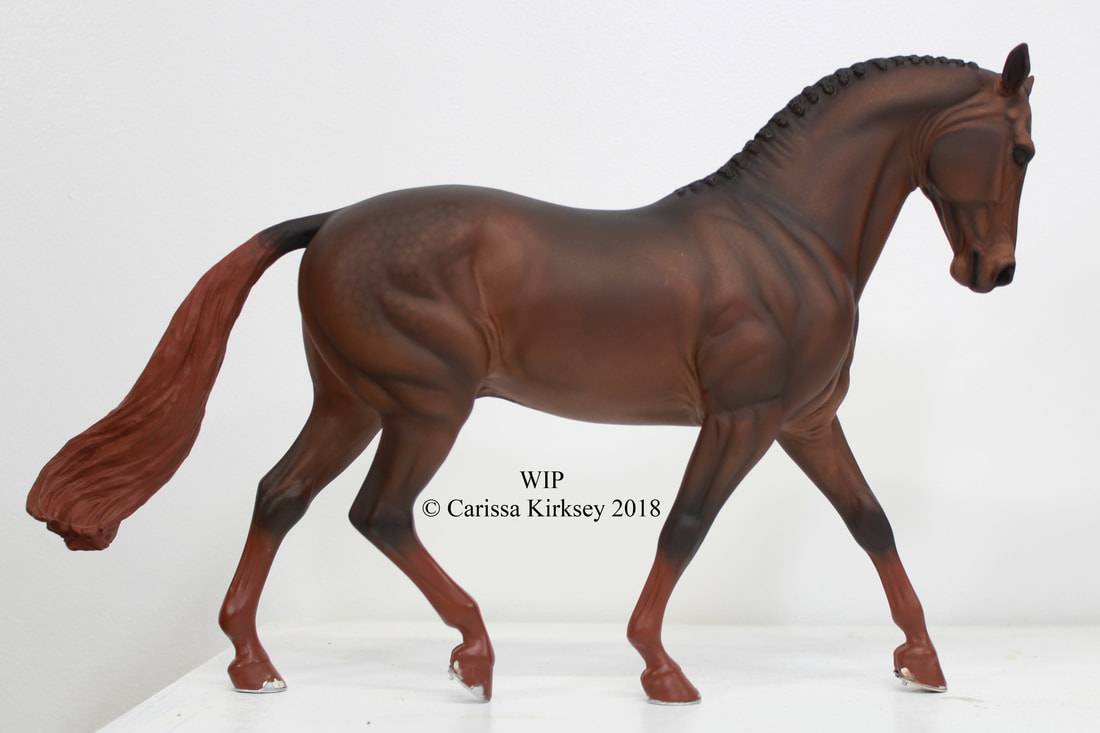 Yeah, I dunno. I'll leave it 'til tomorrow, but I might wash them off & start again. At least I'm not too far along! I also shaded his mouth, nostrils, & eyes, & a little around his head. Not much to look at yet! Carole's moving right along though! "Today I worked on the flaxen blending on her mane and tail. This was shades of cream, light tan, gold Pearl-X, white and pearl Pearl-X. Also popped the chestnuts on because that is a step I had forgotten before. ;D I also sent different pictures besides straight sides. She will be done fairly soon so I am thinking I should paint one of my 3 medallions." & Angel's working on getting her Shire CM's tail attached, etching foals, & making tassels for her Arab costume! "Tail wire... used what I had. Your right glue and soda on fingers is impossible to remove! Used razor blade; pretty sure I don't have a finger print on index finger." 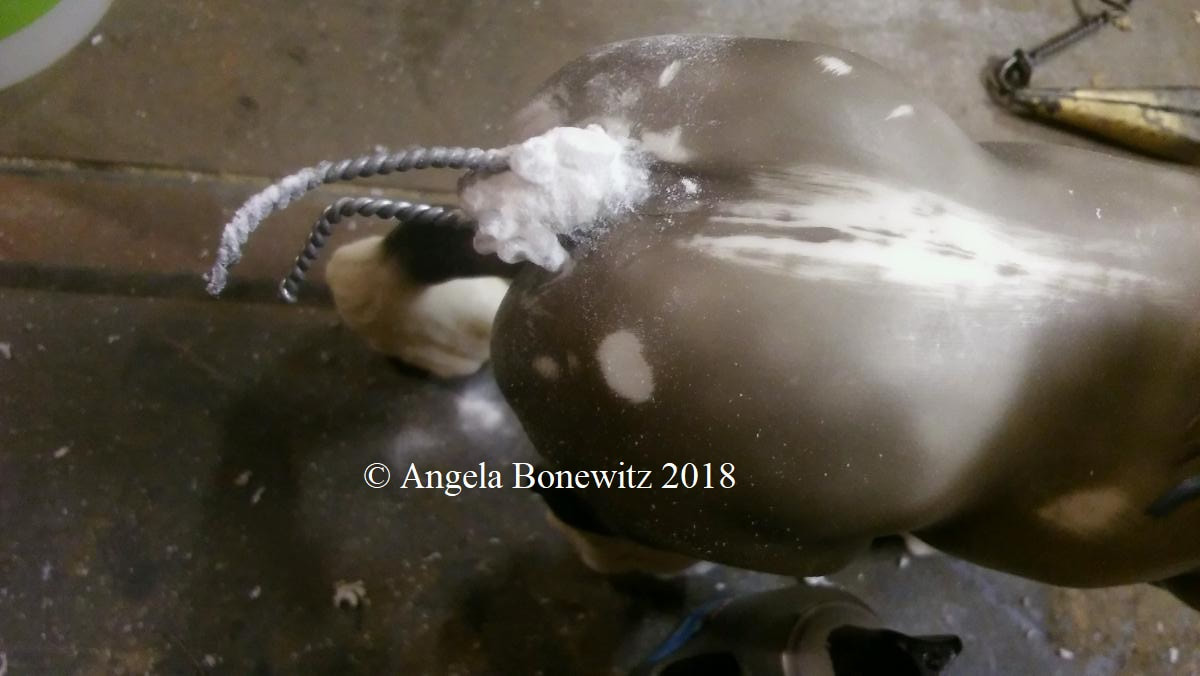 Glad you still have fingers left Angel!
The fun continues! Check back later for more! :) Carole has a report today too! "After more pigments I have her body pretty much where I want. I can do touch ups when spotted. I added acrylics today. Mane and tail French Vanilla and watered down white on socks. Just a base for m & t as they get more colors." 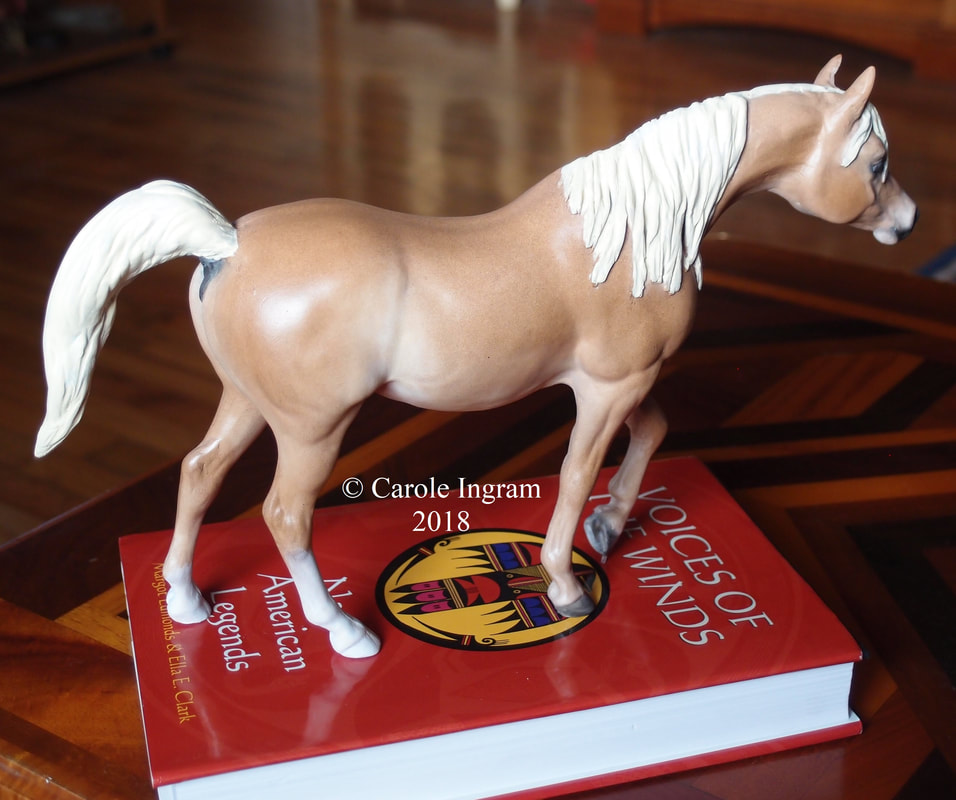 "One big problem is getting accurate pictures. I played with camera settings and they are so varied. Deleted nearly all and kept 2. You can see the differences." 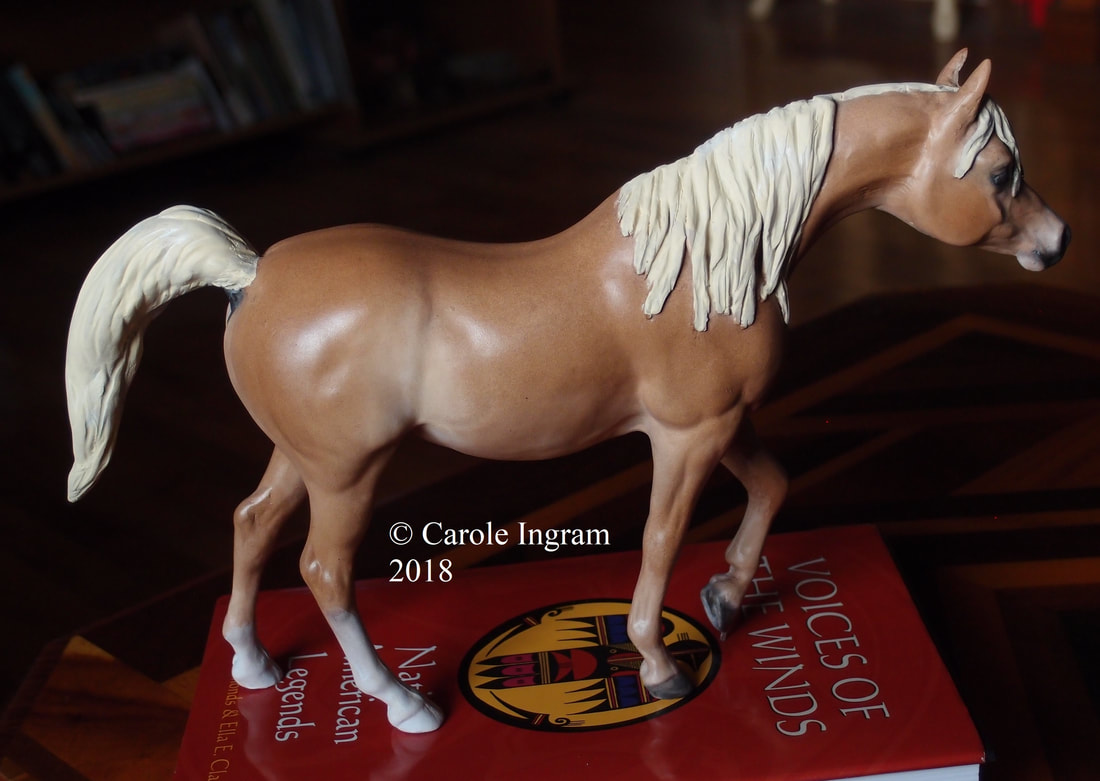 Thank you Carole! She's looking beautiful, in both pictures! I dare say you are going to be the first of us to cross the finish line!
Just me today, & not much to say at that! I am happy to report that Nocturno's oils dried in 24 hours, so he got a couple coats of Testor's Dull Cote today! Unfortunately for him, I spent my free time writing a tutorial on mixing oils instead of moving forward on him! 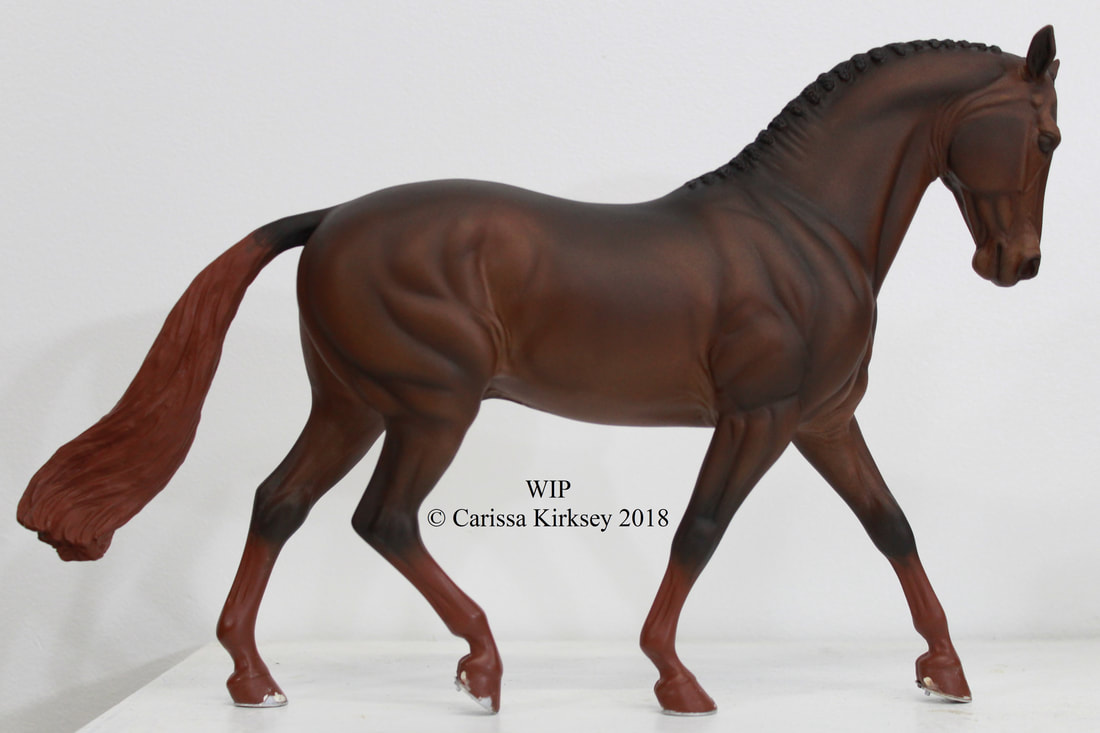 Boy am I ever pleased with him so far though! Hopefully tomorrow he'll get some love. I still have his oil session report to type up too though. We'll see which project gets my time tomorrow!
I hope everyone is having a great NaMoPaiMo so far! Keep painting all! 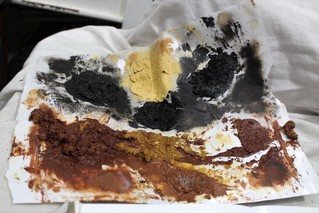 It's not pretty after so many months! But a lot of horses came from this mix! It's not pretty after so many months! But a lot of horses came from this mix! Back in January I finally had to mix a new batch of oils since the last mix, the one I used in part for last NaMoPaiMo actually, had finally dried out. I had mixed it in Dec of 2016 & it lasted until Nov of 2017, so it certainly keeps! This round I actually took the time to take pictures of how I mix a bay/red pallet so I could share it with you! What you'll need: * Pallet paper (not wax paper as it is too thin) I like Artist's Touch brand best. * A pallet knife * Paper napkins or towels * Oil paint in colors of: - Van Gogh Burnt Sienna - Master's Touch Burnt Sienna - Master's Touch Burnt Umber - Van Gogh Raw Sienna - Master's Touch Raw Sienna - Master's Touch Naples Yellow - Master's Touch Lamp Black - Master's Touch Titanium White * Pearl Ex powder in colors of: - Aztec Gold - Super Copper - Antique Bronze - Carbon Black - Micro Pearl (I prefer Pearl White but I'm having a hard time getting it) * An apron, if you're smart, which I usually am not. 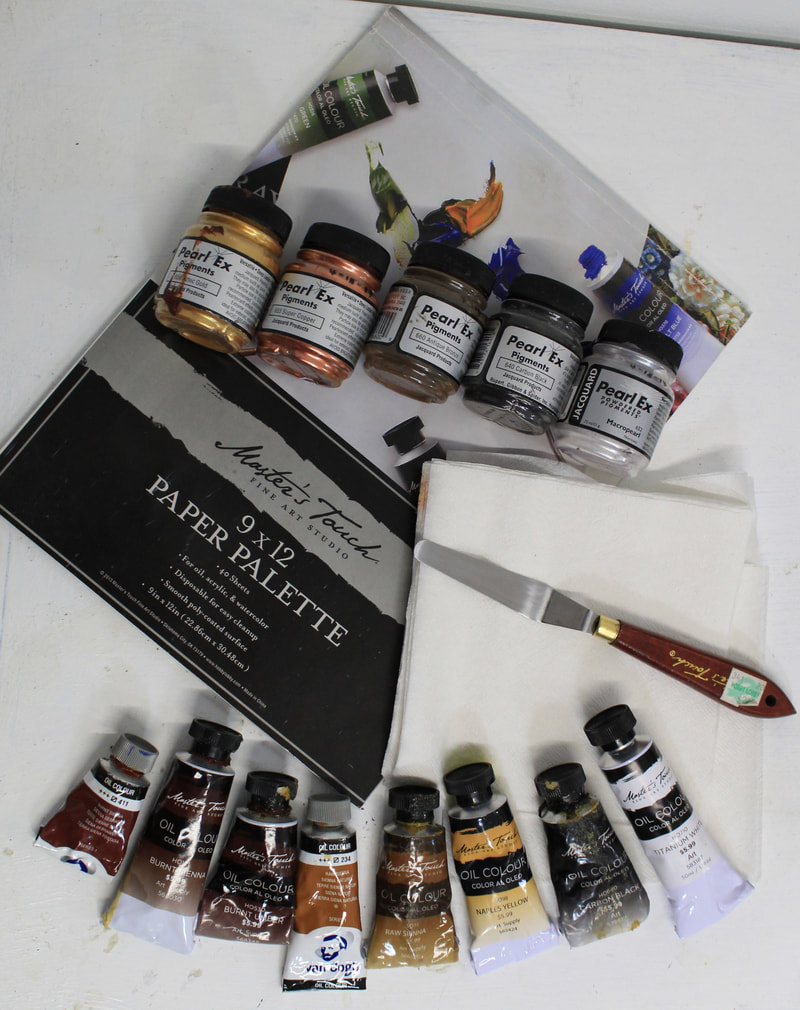 Now, you do not have to run out & buy the same colors in different brands. I use two different brands, Van Gogh from Pat Catans & Master's Touch, the Hobby Lobby house brand, because the tint varies from company to company. Since I have them both around I have the liberty to use both when mixing batches. I would warn against Winton brand oils though: In my experience, they have a very lurid color which I did not like in the least. It may work fine for you though! Everyone is different! When painting in oils, or at least how I do, you start with the body color (the middle, medium shade of your color) & move out from there adding the highlights (the lightest color of your horse), & then the shading (the darkest color besides any black points). So you are going to need to mix at least three colors. Since I paint many colors on a regular basis I mix oils in bulk so I don't have to spend a chunk of my time mixing paint every time I need it. I also mix several different shades at a once so I can move up & down the 'scale' of color to do different shades & colors. What is body for one horse may be shading for a lighter horse. What is body for another could be highlight for the darker colored horse. It all depends on what base color you put down & what three shades of oils you put over them. For this batch, I mixed five colors. For need to call them something I named them, as seen in the picture below. 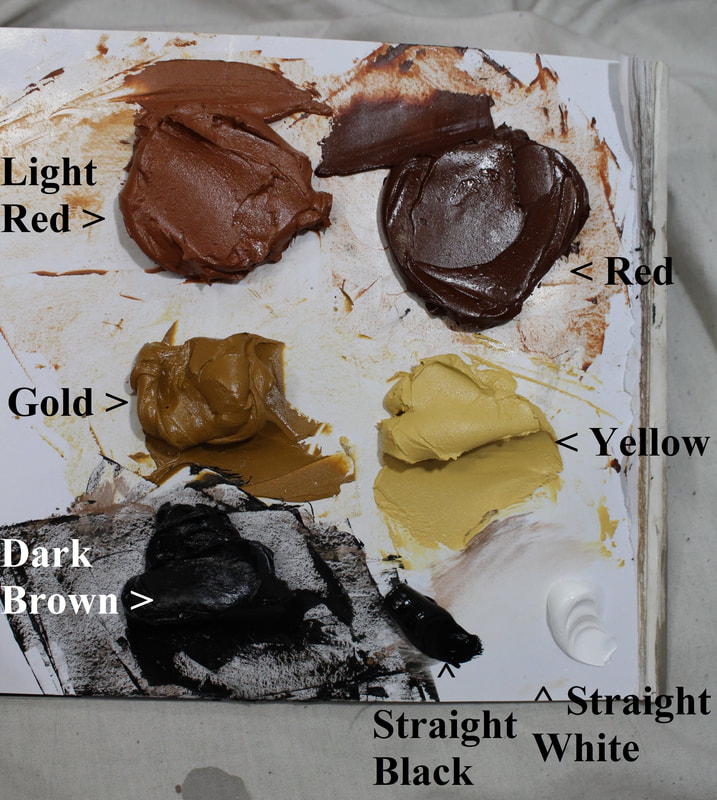 To start, fold a sheet of pallet paper in half. Once the paint is mixed you will fold the paper over to store it, so you will only be mixing it on one half & the crease.  I've tried several brands of pallet paper. I really like the Master's Touch brand best. Do avoid grey colored pallet paper; it throws off the look of your color! As I said, I mix bulk batches. If you don't plan to paint a herd of horses over the next year you won't need anything near as much as I am doing here! It really takes very little oil to paint a whole Trad scale horse. That said, better to have too much than too little, & it does save very well. Starting with the Red mix: I used both brands of Burnt Umber,  You can clearly see the difference in shade from both companies! I *think* that it is Van Gough on the left & Master's Touch on the right. Mix it up thoroughly with the pallet knife. Now add Pearl Ex. The main purpose of Pearl Ex it to add a gleam to your finishwork. The effect of adding several different colors of Pearl Ex to your mix is akin to looking at a furry creature's coat in the sunlight: have you ever noticed the prism kind of glow they have? Same thing when your finishwork is in sunlight. It also has the extremely helpful benefit of making your oils dry much faster! I do not use any driers at all in my paint. Honestly they scare me! They can be dangerous. So I pour in the Pearl Ex to just short of making mud out of my paint. Depending on the colors (some oil colors dry slower than others), & the weather at the moment, my oiled horses are usually dry to the touch in an easy one to two days. With the tip of the pallet knife, dip out a bit of Pearl Ex; in this case Gold. Don't make a mess with it like I did though! Go easy on adding Pearl Ex, it likes to pouf everywhere while you're mixing if you add too much all at once. To this Red mix I also added Copper, Bronze, & Black Pearl Ex. For a finished mix of this. Much more luminous, isn't it? 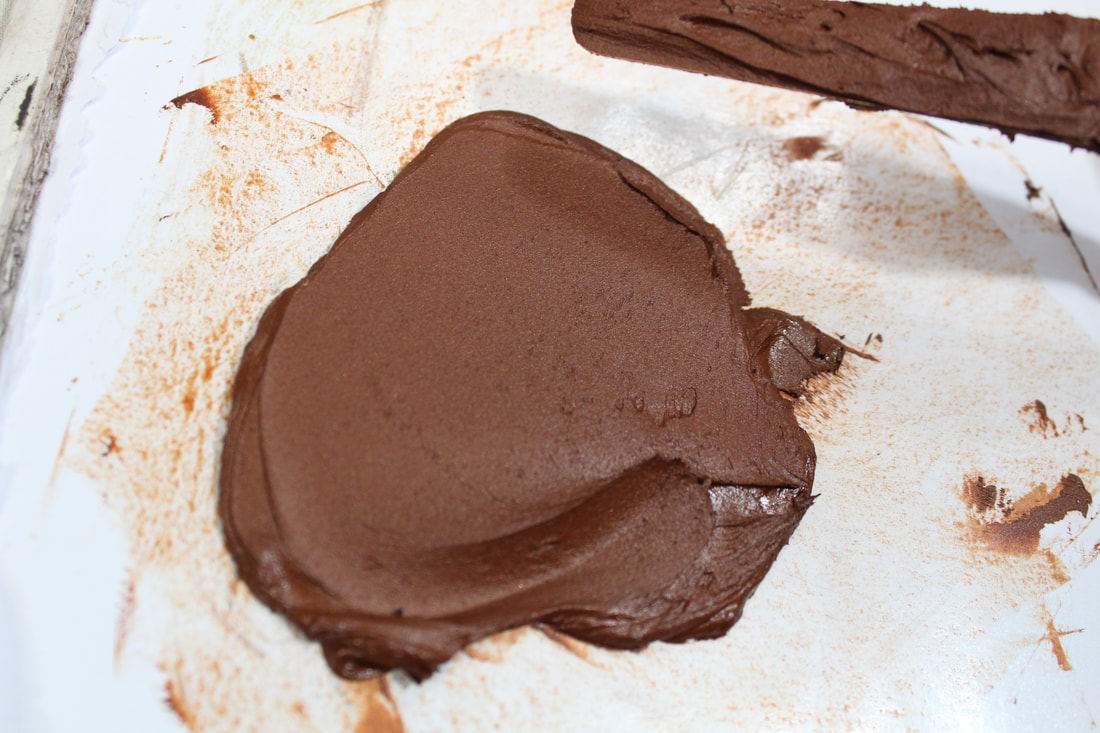 From here on out I didn't take as many pictures, but it's pretty much the same deal. The same technique was used for the other mixes, just different colors used. Make sure to wipe the pallet knife clean with a paper towel when you move on to a new color mix. Here is the Light Red. Both Burnt Sienna, both Raw Sienna, & Master's Touch Naples Yellow oils. Gold & Micro Pearl Pearl Ex. The Gold Mix is both Raw Sienna oils, Gold & Micro Pearl Pearl Ex. 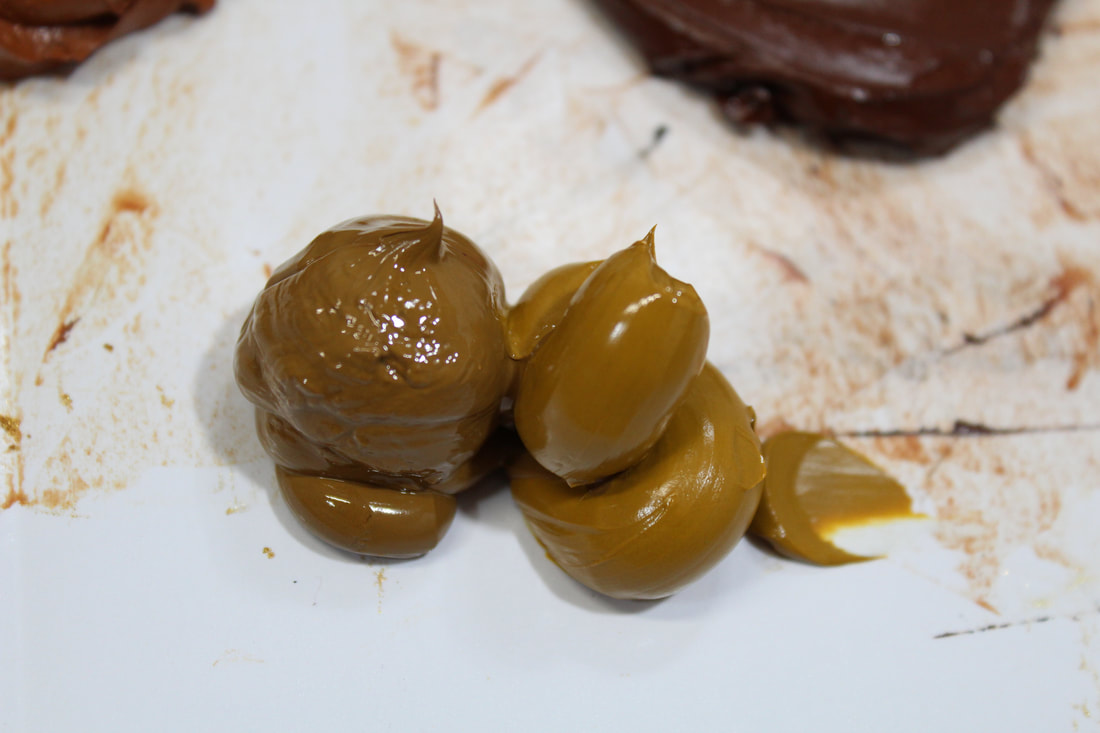 Again you can see the difference in shade between the two companies. Yellow, Master's Touch Naples Yellow oil & Micro Pearl Pearl Ex. 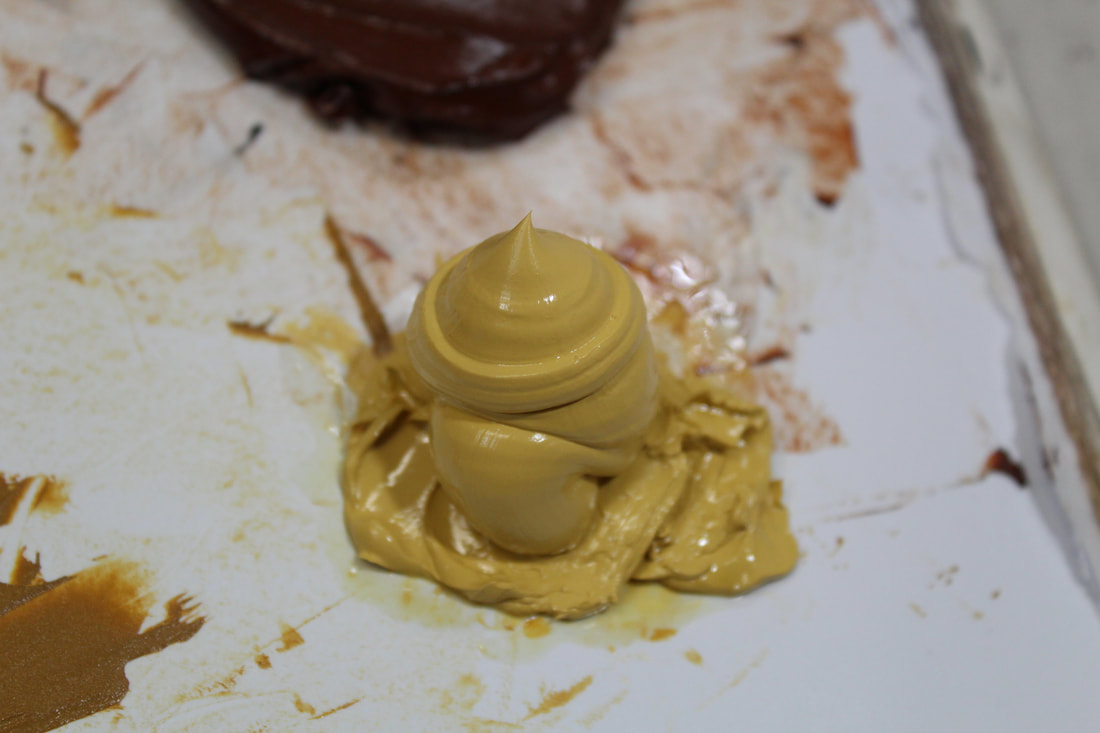 Dark brown, which is mostly used for shading is almost black. Once you blend it in with your body color, it mixes with the body enough that it tones down to a little bit lighter brown than it starts. ...If that made any sense! It is a mix of Master's Touch Burnt Umber & Carbon Black, with Black & Bronze Pearl Ex. 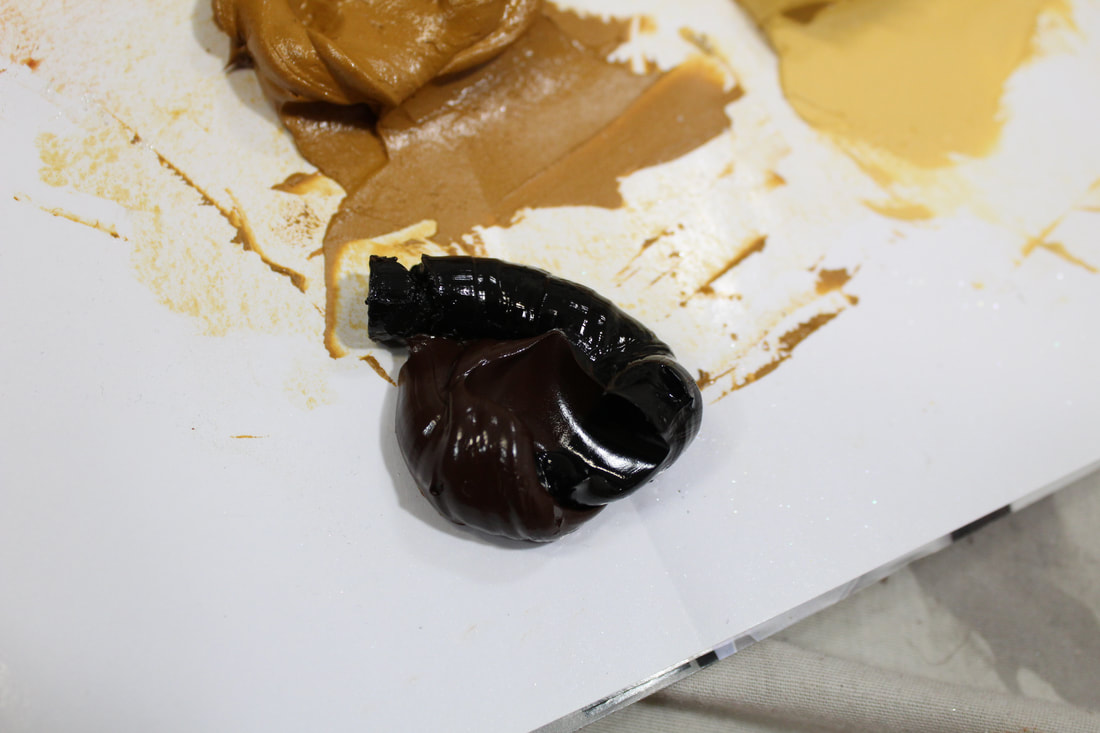 Then I add a little Master's Touch Carbon Black & Titanium White straight out of the tubes to the pallet. The white is for particularly light areas like mealy muzzles or bright flaxen hair tips. The black is for points, which will look even darker black if there is no Pearl Ex bouncing light. 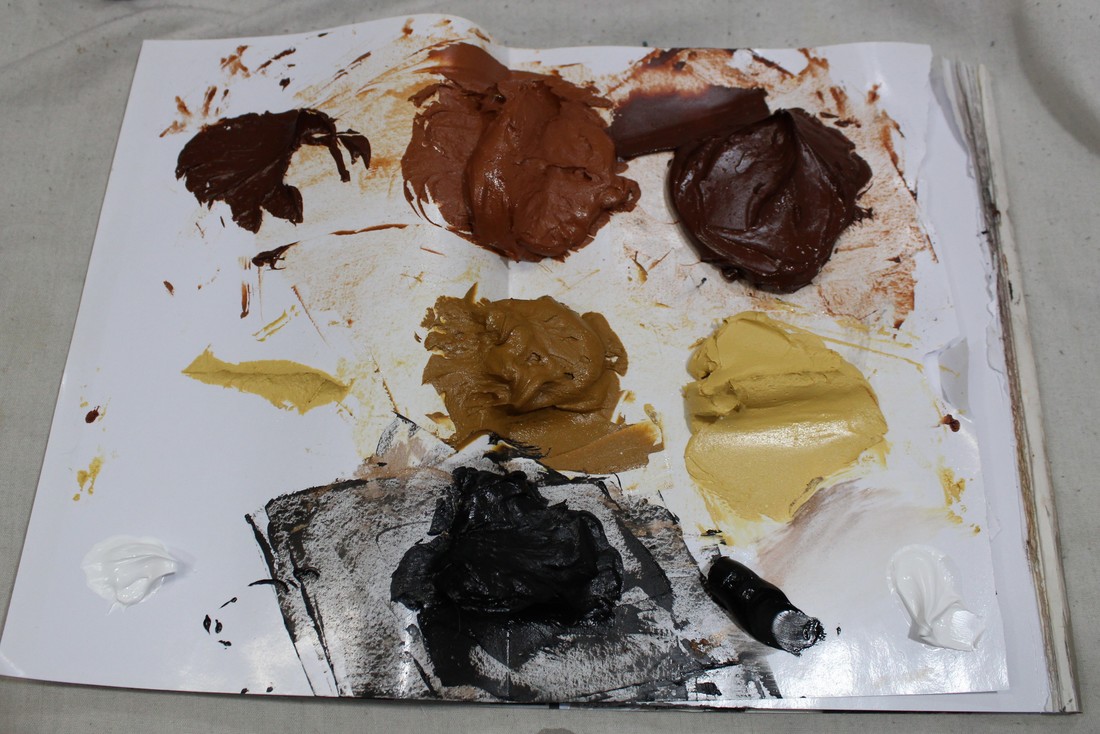 Once you are happy with your new mix, fold the paper over on itself, write what color this pallet is & the date it was mixed on the back of the paper, & pop it into the freezer. You can put it into a zipplock for further protection, & a tupperware container is a good idea if there's a chance your pallet might get squished in the freezer. 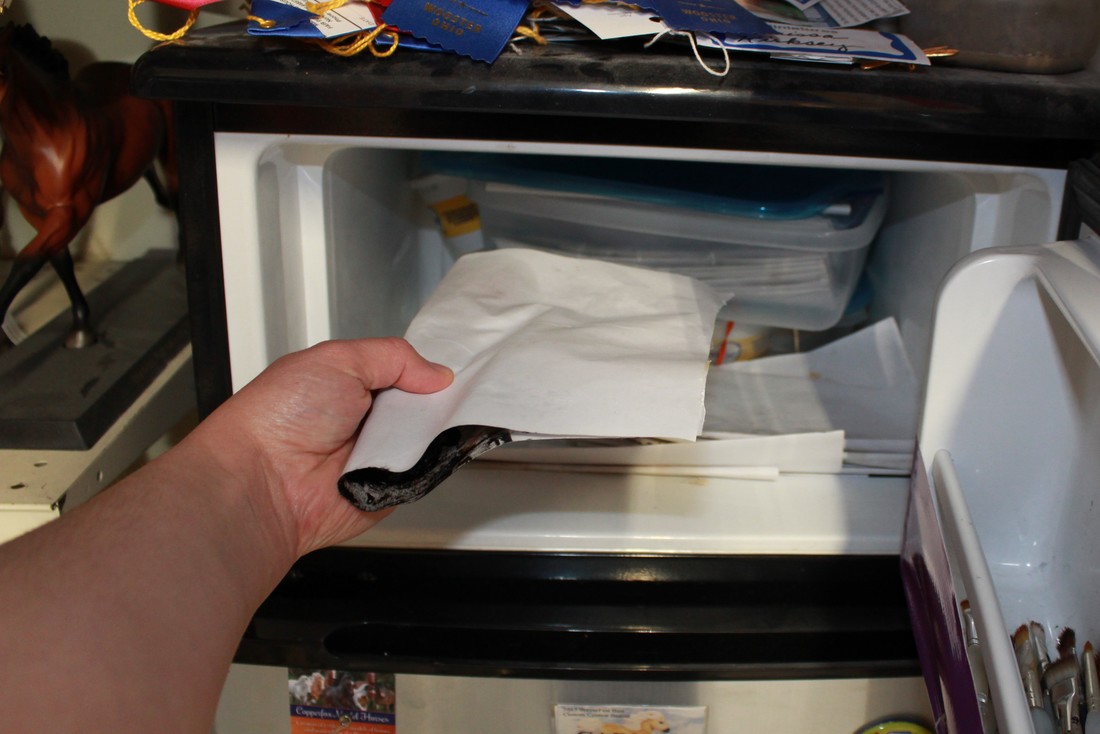 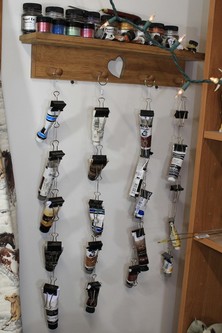 & a great way to store your oil tubes is to hang them with binder clips! So you don't have to sift through later, here is my loose red/bay color recipe for you: Red: Van Gough & Master's Touch Burnt Umber oils. Aztec Gold, Brilliant Copper, Antique Bronze, & Carbon Black Pearl Ex. Light Red: Both brands Burnt Sienna oils. Both brands Raw Sienna oils. Master's Touch Naples Yellow oils. Gold & Micro Pearl Pearl Ex. Gold: Both brands Raw Sienna oils. Gold & Micro Pearl Pearl Ex. Yellow: Master's Touch Naples Yellow oil. Micro Pearl Pearl Ex. Dark Brown: Master's Touch Burnt Umber oil. Master's Choice Carbon Black oil. Bronze & Black Pearl Ex. Master's Touch Titanium White straight from the tube. Master's Touch Carbon black straight from the tube. There is no precise measurement for mixing oil color, so trust your eye & mix it to your need & taste. An interesting note too is that these six colors are my entire stash of oils. From just Burnt Sienna, Raw Senna, Burnt Umber, Naples Yellow, Carbon Black, & Titanium White you can pretty much mix the entire rainbow of the horse world. I do add some Cobalt & Ultramarine Blues to blue-based blacks, but other than that, those are the only colors I ever use. Hopefully that helps you on your journey in oil paint! If anyone ever has any questions, feel free to drop me a line!
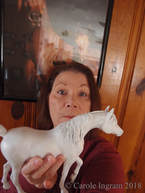
Happy painting!!! Three CDs of Journey to the Center of the Earth & four episodes of Doctor Who & this is where I am:  He still has layers to go in oil & pastel chalk, but this is a good start! I am cross-eyed, so I will elaborate more later. Until then, here are Carole & Kim with their reports of the day! "Here we go with around 5 layers. Working creams, black and metallics in there. Have my TOPSA show finished so she gets all my time now. ~ Carole" 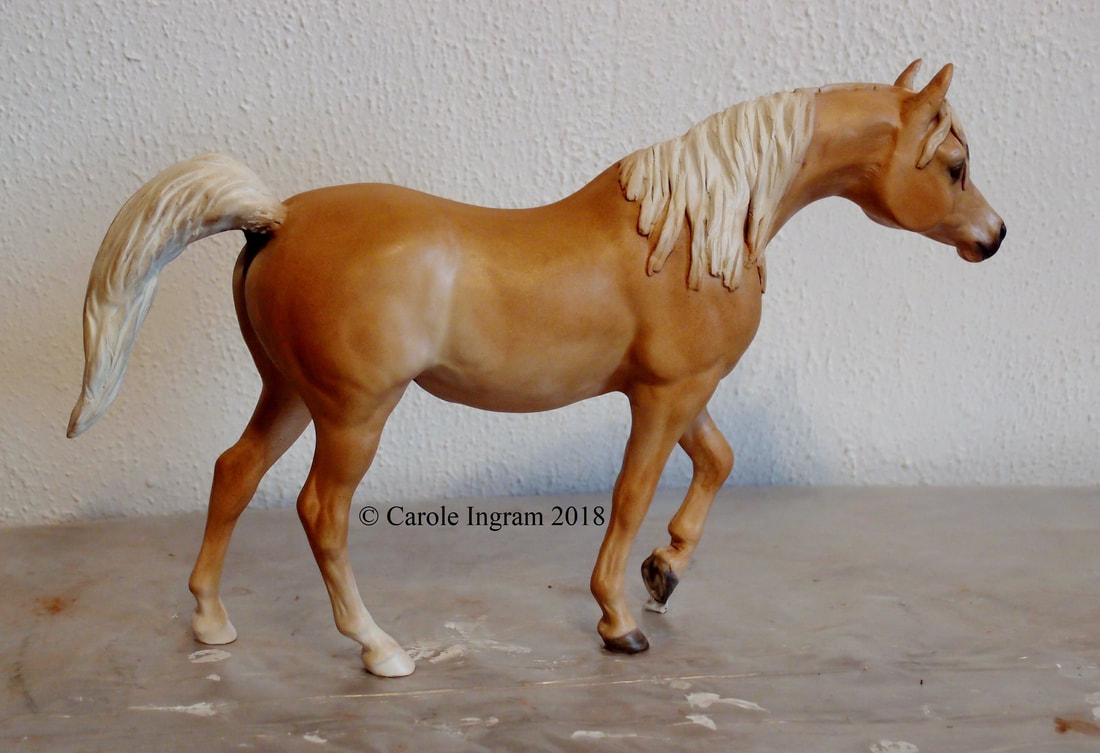 "Our first weekend has come and gone already! Mine was actually quite productive, both in painting and household chores. I got multiple horses based. And the house finally cleaned after having the flu for two weeks. Yuck! I thought I would include my airbrush setup/booth. I like to base my horses using an airbrush, I feel it gives a very smooth layer. I have a Badger Anthem airbrush. I still don’t know much about airbrushing, all of it has been self-taught and lots of watching YouTube tutorials. I would be very curious to know how other people mix their paint for airbrushing. I’m still struggling with that!" 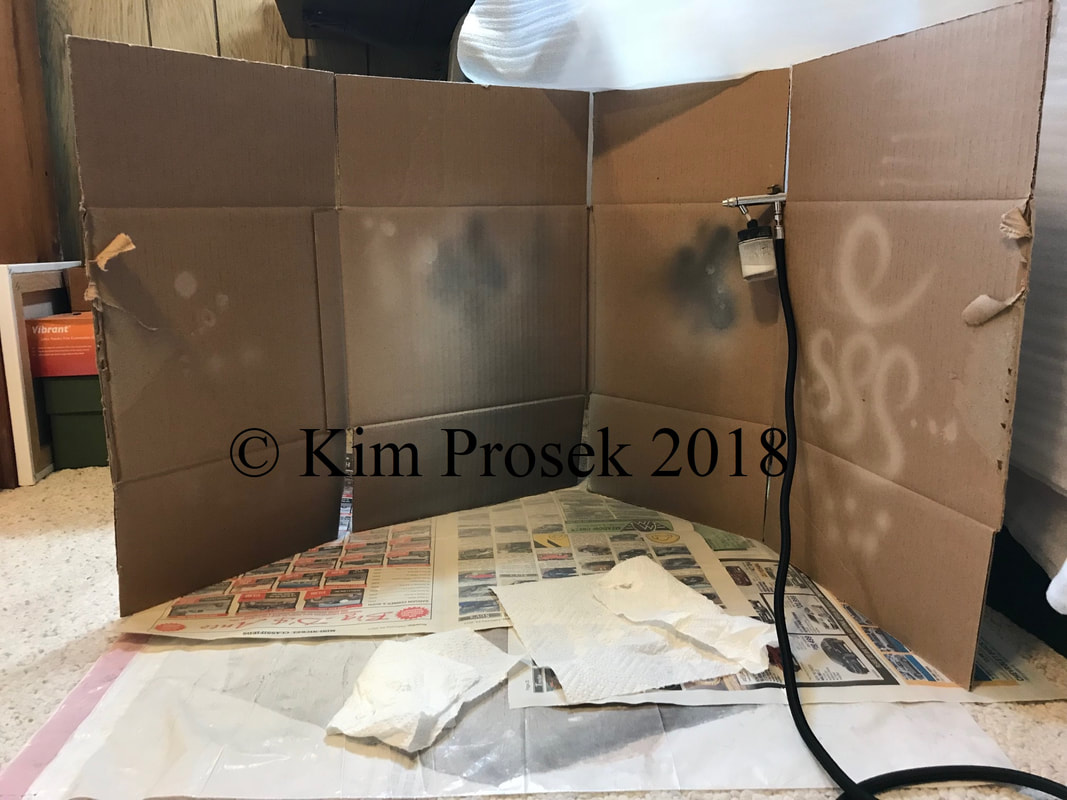 "My setup includes putting down a plastic sheet, newspaper over it, and a box that has been cut open to contain some of the spray. I also like to have paper towels handy for any drippage. It’s not the prettiest setup but it works for now. Also, make sure to wear a respirator of some kind! Pegasus Furia is based in a warm white and I started some chestnut color on the lower legs. Since she will be similar to a Ferruginous Hawk, I’m thinking her body color will be varnish roan. There are two color morphs in these hawks and I’m leaning towards the lighter color morph. We’ll see if that’s what she wants! I’ll try and find a pic of a ferruginous for the next blog. "Until next time, happy painting! ~ Kim" Happy NaMoPaiMo all! Check back later for more! Alright! We have tea... 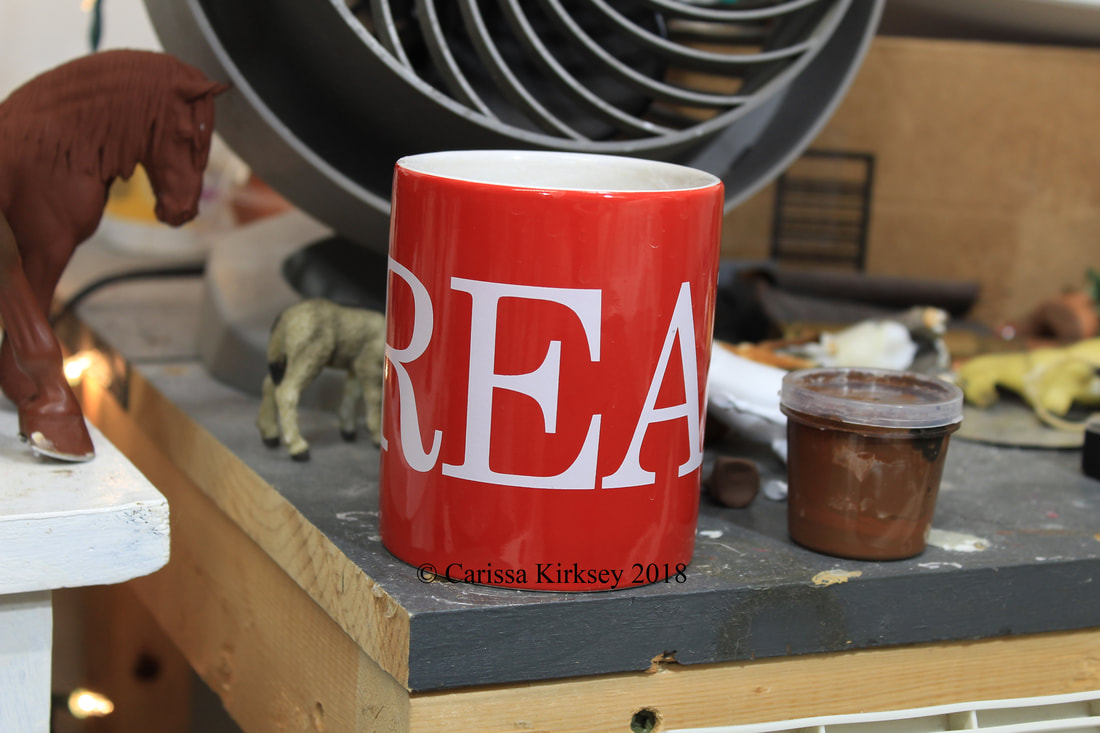 It says READ, just so ya' know. ;) Ten hours of unabridged listening... 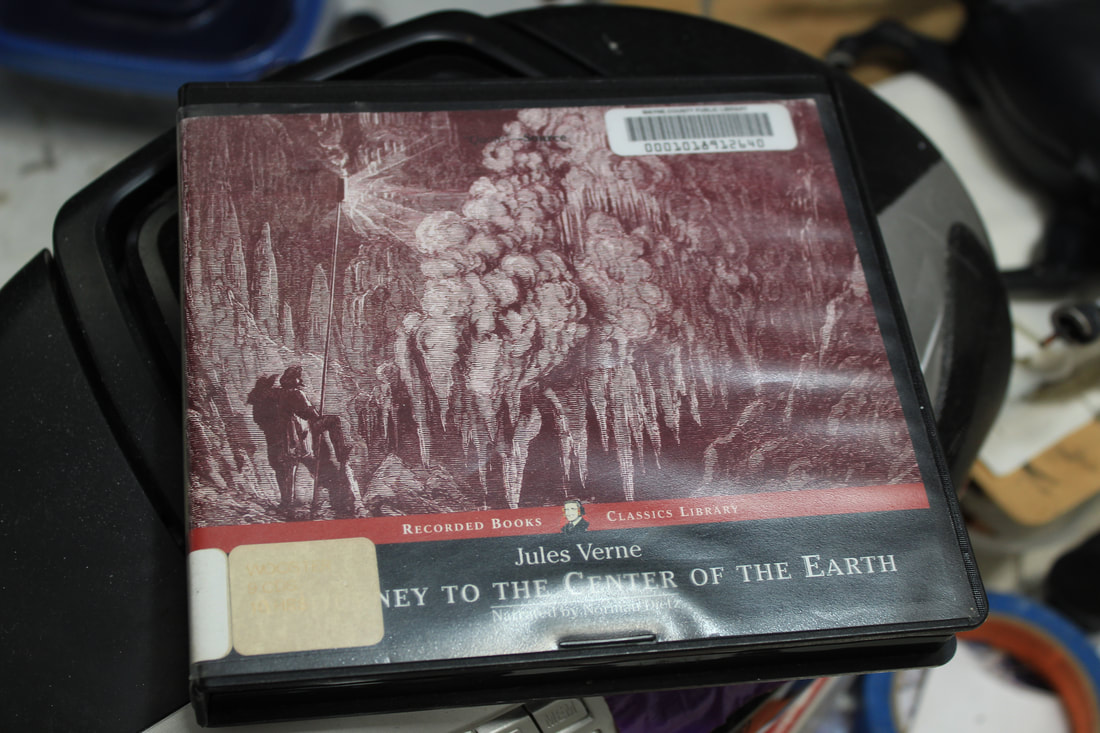 Seriously good book if you never read it! A brand new mix of red/bay oils... 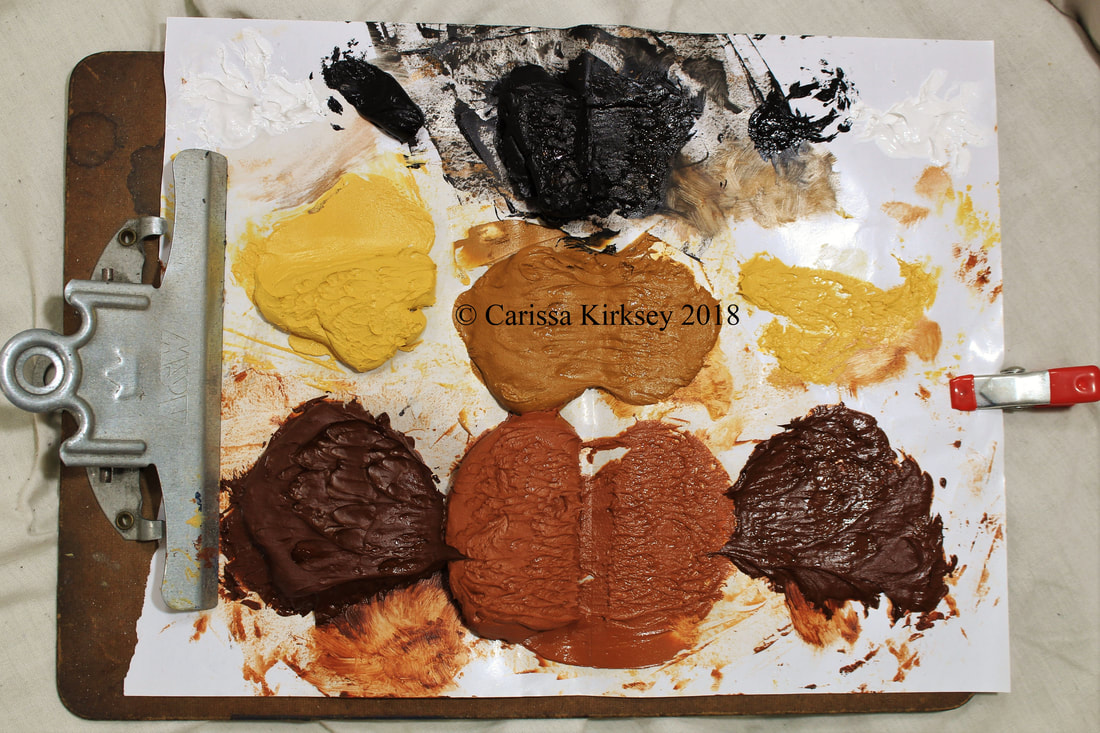 A tutorial on mixing oil paint is coming in the next few days. & a prepped, shod, & based horse. 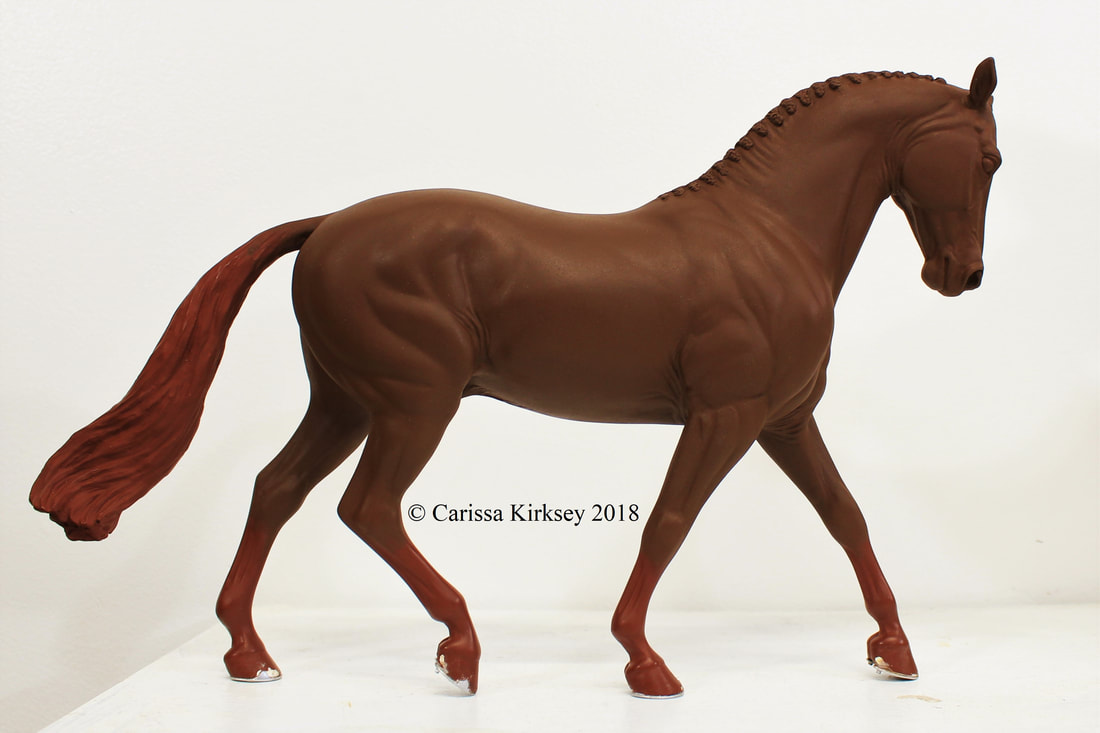 Reference is pulled up. Time to finally dive in!!
 Those are the words of my friend Angel who text me this picture today! I invited her to do NaMoPaiMo with me kind of at the last minute. On Tuesday she came by to root through my body boxes for a victim & officially sign up. She found a classic Shire A that called to her & decided she wanted to make him a Gypsy; to take off his mane decorations & swap his braided tail for a Smart Chic Olena tail, also from my hoard. His new do was just started today! Once that's all finished, he'll be headed for a dark liver chestnut with flaxen m&t! It's going to be fun to have someone to paint with this year! Carole made some progress as well! "This is my first sealed layer. Used Brown Ocher (body) and a dark grey mix on eyes, hooves, etc)" Her PAM is going to be flaxen chestnut with a little white when she's finished! 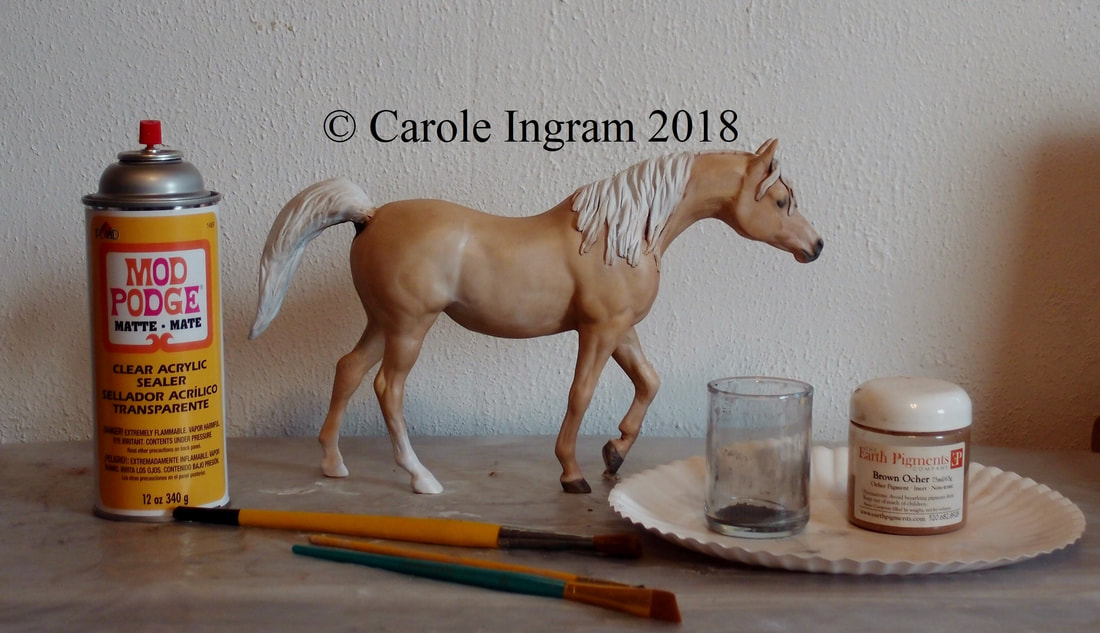 As for me... Still shoes! I wasn't going to finish them until after he was painted, but I decided to go for it. His shoes are made of pounded out 12(?) gauge aluminum florists wire, groove pounded in with a screwdriver & refined with dremel, filed & sanded to a fare-thee-well, studs added with sewing pins sculpted over with epoxy, & toe/side clips & nail heads sculpted on with epoxy. Anything sculpted was filed & sanded to where it's meant to be & painted silver with Precious Metals paint. Then I painted in some dirt with a little acrylic, which made it all pop! These were the only two shoes I detailed; since his weight baring hooves are not detailed on the bottom I cheated & left the aluminum flat. ...Apologies for the fuzzy pictures! Kim does not yet have anything to report. She hopes to by tomorrow, as do I! I plan to have a serious oil session in the afternoon!
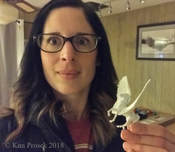
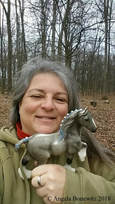
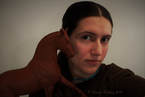
Hope everyone's having a great third day!! Check back tomorrow for more on our NaMoPaiMo journey!! NaMoPaiMo started today!! Can you feel the spark in the atmosphere? I can! Everyone is so excited & I love that! Since last I posted I have been joined by yet another friend for NaMoPaiMo, having talked my friend Angel into painting with me! She's joined a bit last minute, but has a great idea for her classic Shire A! Earlier this week Jennifer, NaMoPaiMo founding mother, asked painters & their victims to take a selfie for a start-of-the-month collage, which we all did. I can't help but share my beautiful friends here! Here are our self portraits, except Carole, who does not like pictures & wished to remain off my blog, which is perfectly fine! *Edit* Carole took a new selfie & gave permission for it to go on my blog! So we all are here now! :)
 It's been a slow start for us all on this first day of NaMoPaiMo. Carole has been judging a TOPSA photo show, but is set & ready when the time allows. Angel has been working on an Arab costume, which is looking pretty darn good I think! Kim has been stuck at work; you can bet that her weekend will be full of painting though! & I have been shoeing my chosen pony. 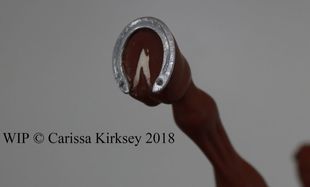 Detailing & fitting Nocturno's new sneakers was the majority of the work done on him today. I'd meant to do it before day one, but other things called. The shoes are still not completely finished, but they are done enough that I won't be endangering my paint work now. ...I'd like to take a moment to mention how much I love my ferrier! Carl is always more than happy to show exactly how different shoes are done! I did get Nocturno's first few coats of base laid down before quitting for the day at least. That's the first official paint of the month! Much more to come later! Check back soon for updates & how-tos!
Happy painting everyone!!! |
AuthorRamblings & tutorials of a model horse artist. NOTE
Just a 'public service notice' to any of my blog readers; Since there's not really any way to 'follow' a weebly blog, if you shoot me an email (sprucewoodfarmsstudio at gmail dot com) I will add you to my blog announcement list & will send you an email when a new post is added. :) Categories
All
Archives
June 2024
|
 RSS Feed
