The Art Of Carissa Kirksey ✝
  • Home
  • Finishwork Galery
  • Finished Piece & U/P AR Sales
  • Blog
  • Winner's Circle
  • Commission pricing & policies
  • Contact Me
  • About Me
  • Thank You
  • Dictonary: Terms & Abbreviations
  • Wayne County Ohio Fair
  • John 3:16

NaMoPaiMo: Finis Coronat Opus

2/28/2017

0 Comments

 
PictureNaMoPaiMo logo designed by Margaret Balch & used with permission.
 The end crowns the work: The true value of an undertaking or a work of art cannot be fully discerned until it is finished. 

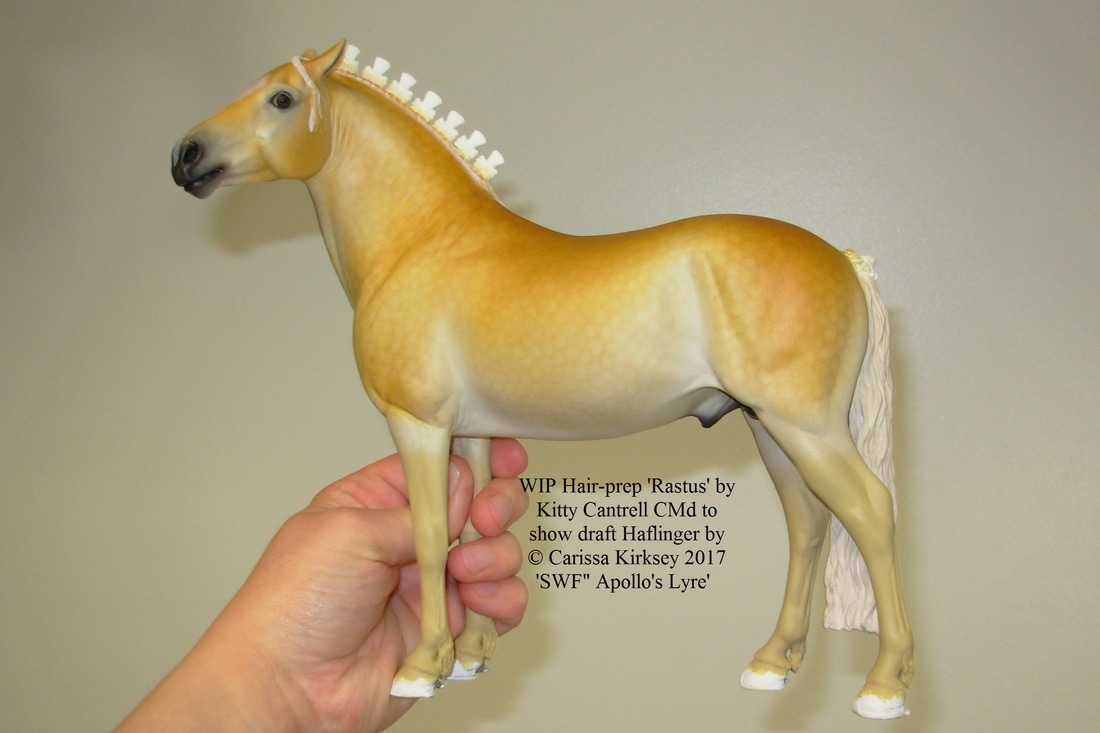
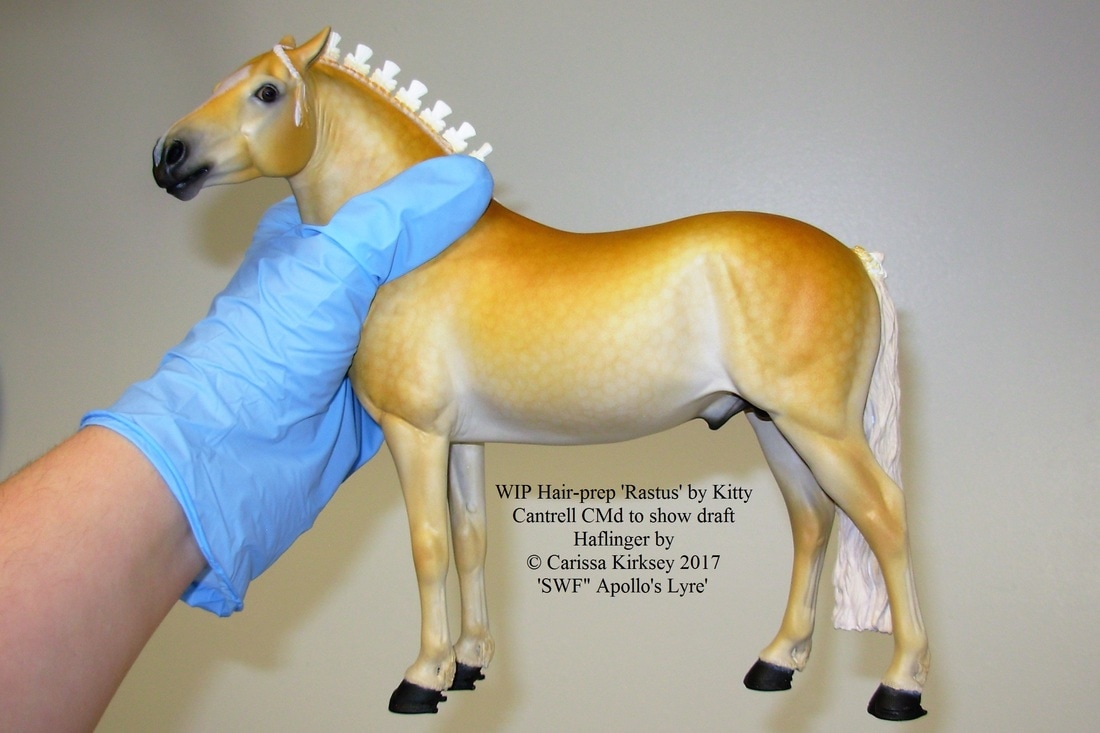
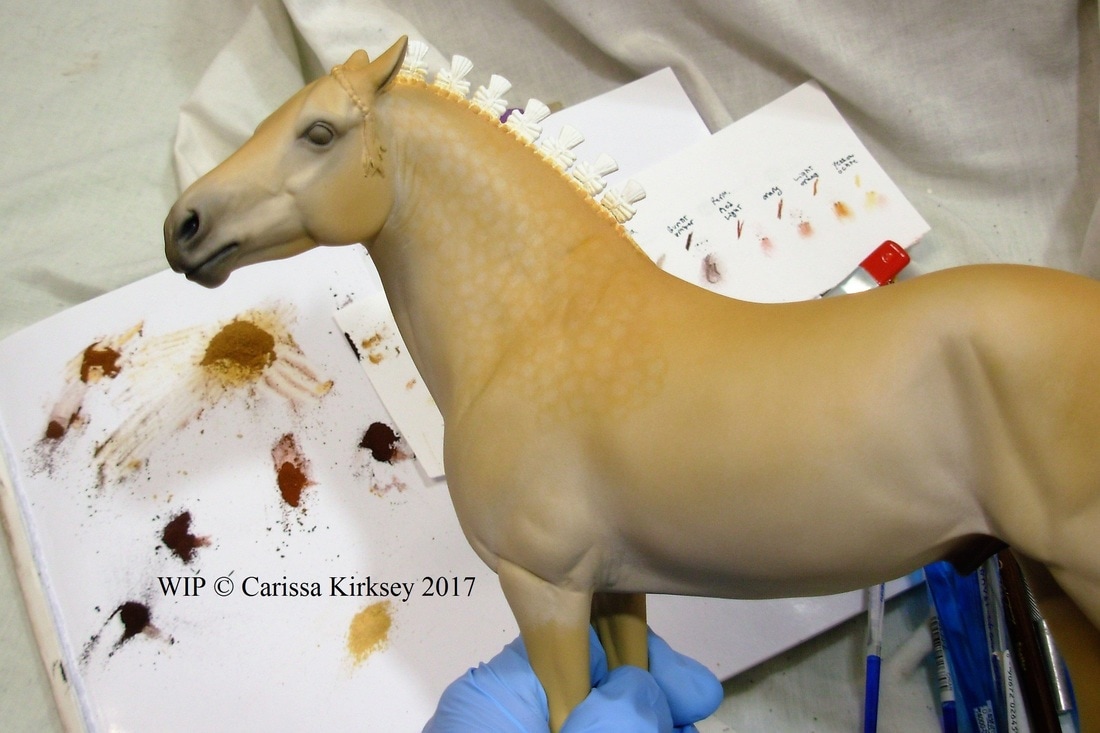
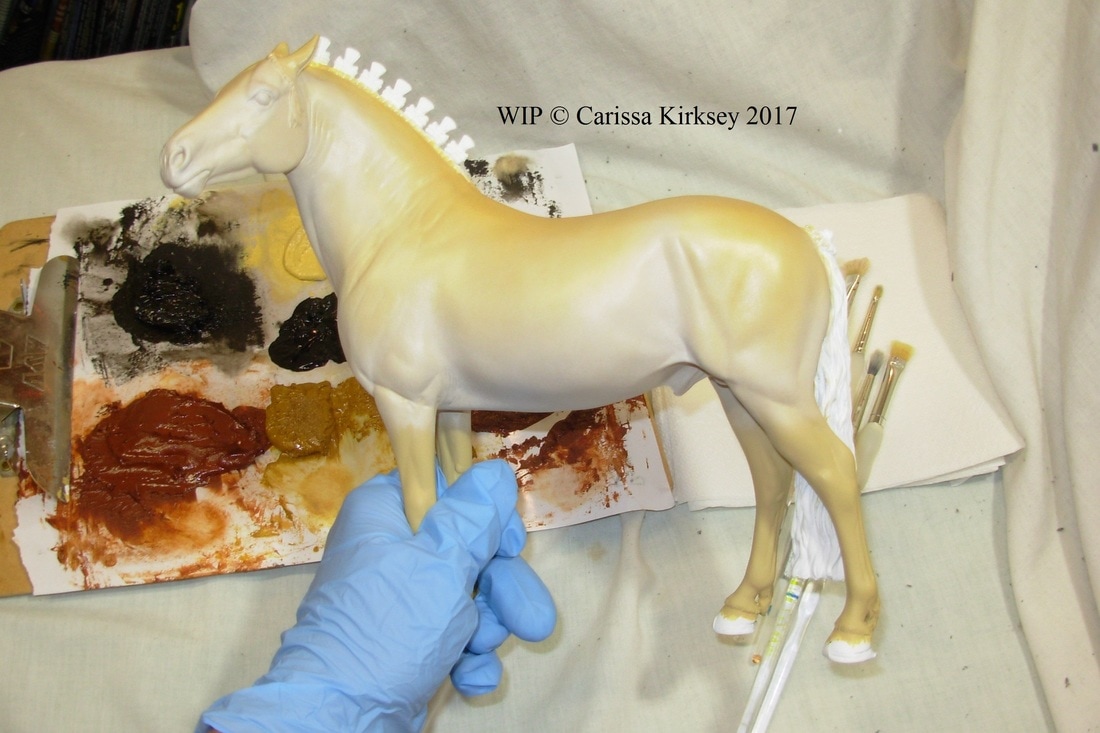
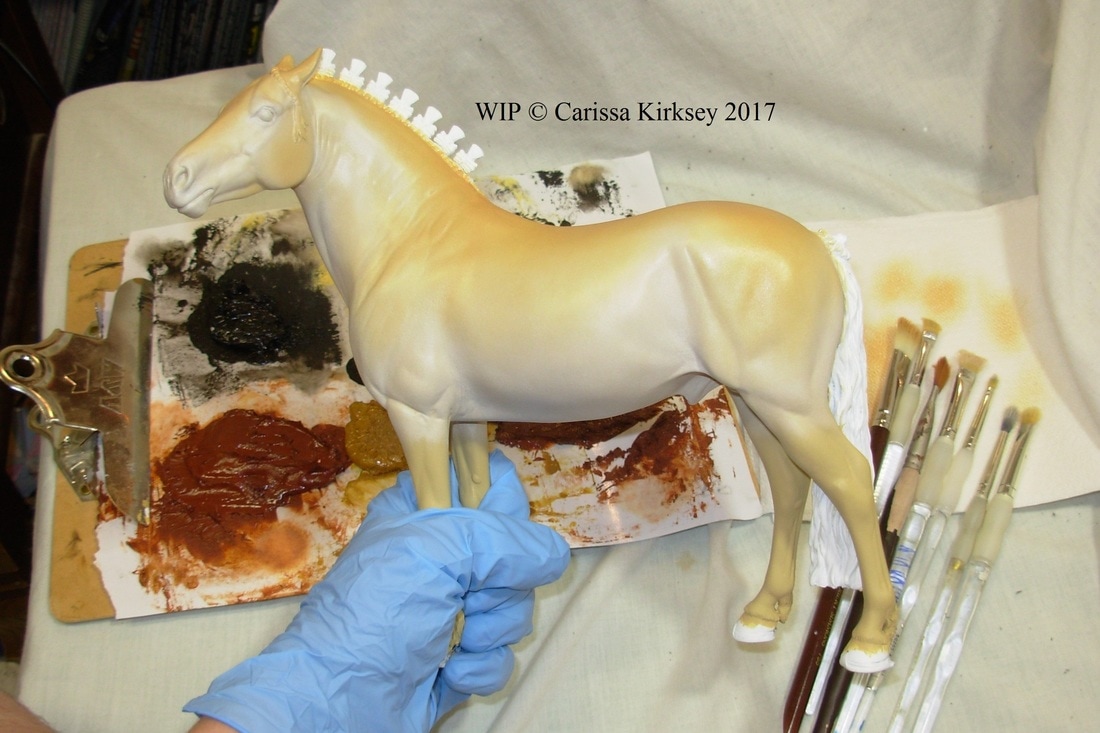
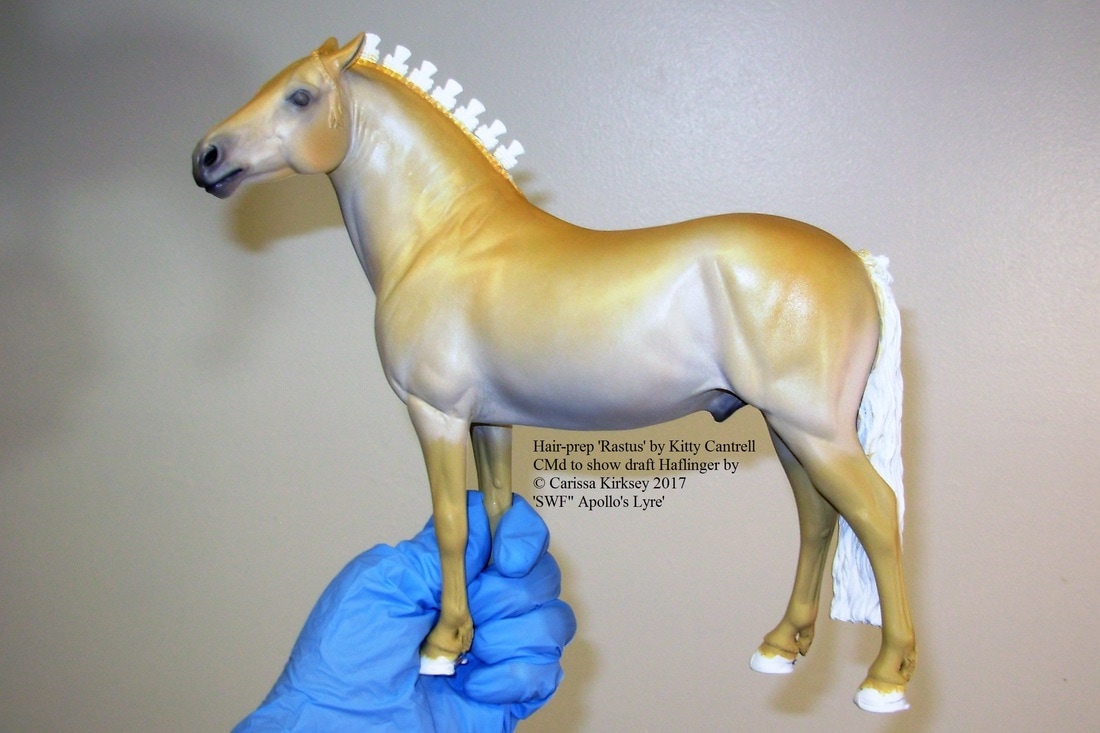
 Today marks the end of the first ever National Model Paining Month. It has been beyond amazing to see so many artists, professional & novice, participate in painting a pony for February. I think no matter if you finish before midnight or continue into March, whether your pony turned out just as you dreamed, or fell short of your expectations, this has been a roaring success for all. I learned a lot from what others have been kind enough to share this month, & had a ton of fun watching the progression of so many horses. I completed my Rastus yesterday, & I promised to have better pictures for you today, so here they are. :)
 ...I have a little, sort of related, confession to make: I broke down & bought myself a Canon Rebel T6 last month. I absolutely had to have a new camera, there was no going on with my over-a-decade-old-&-seriously-senile Nikon point & shoot. I about went into a coma spending the money on it & the accessories, & have now spent over a month being too scared to touch it!  But today I have overcome my fear & taken my first pictures with my new treasure! ....I'm in love!!! The pics were still taken after dark in my glowingly well lit workroom, but oh my!!! They are stunning!! There's no turning back now!!!!


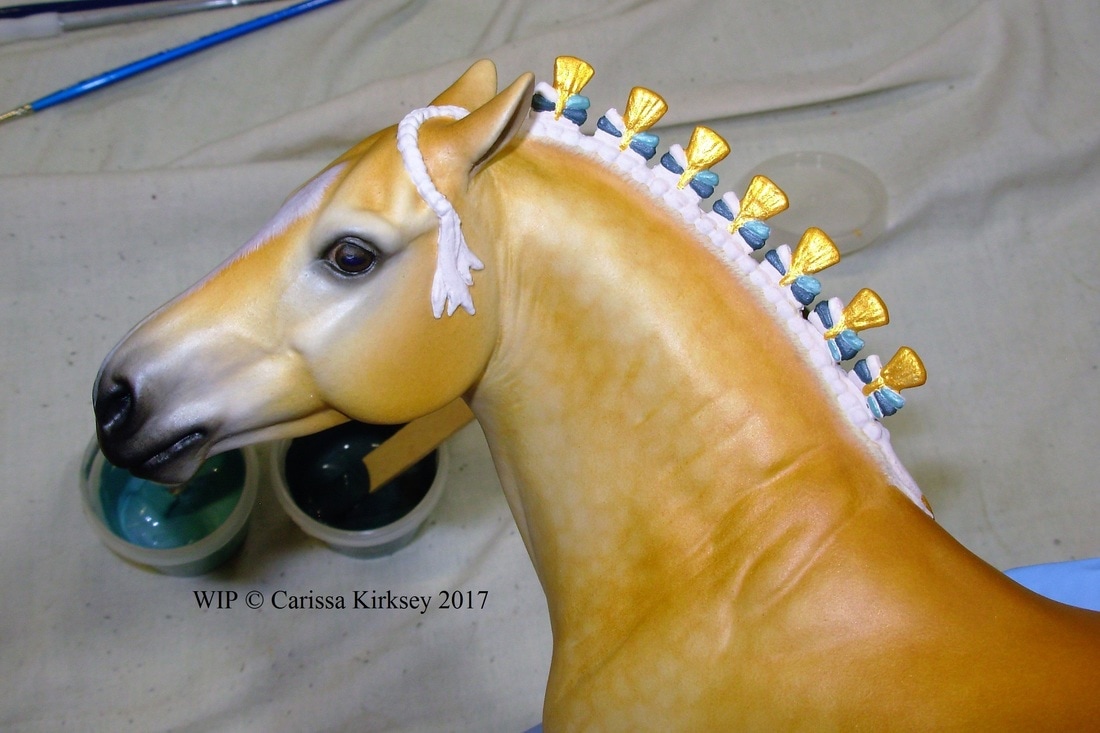
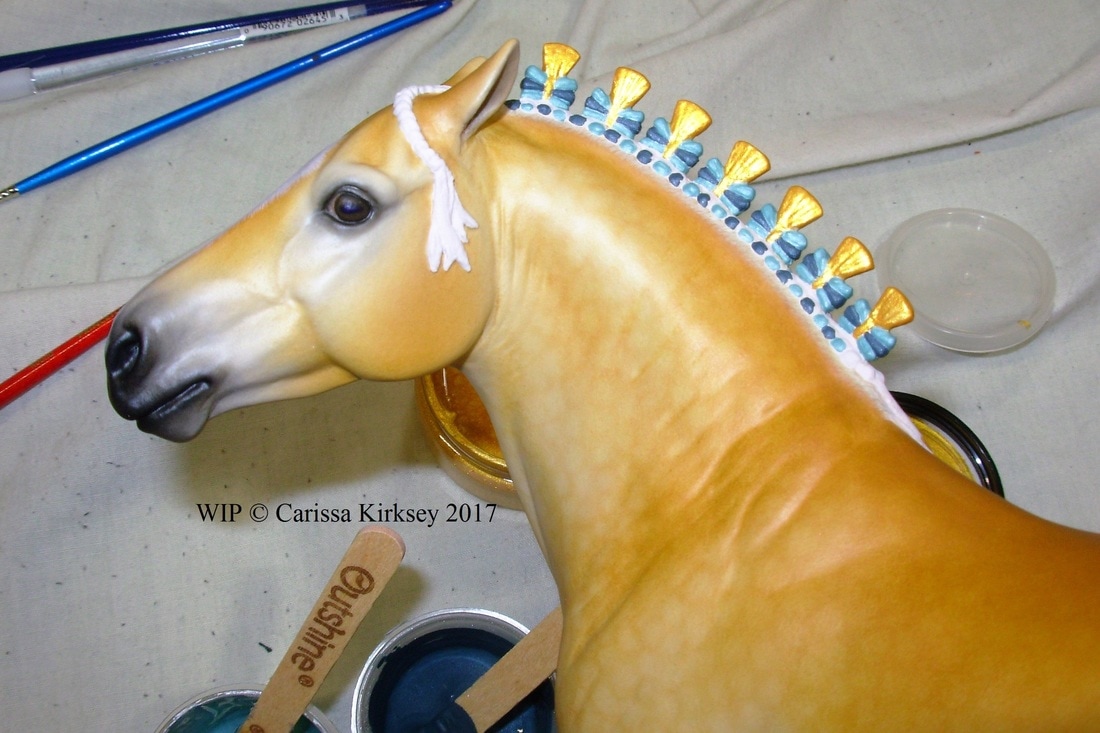
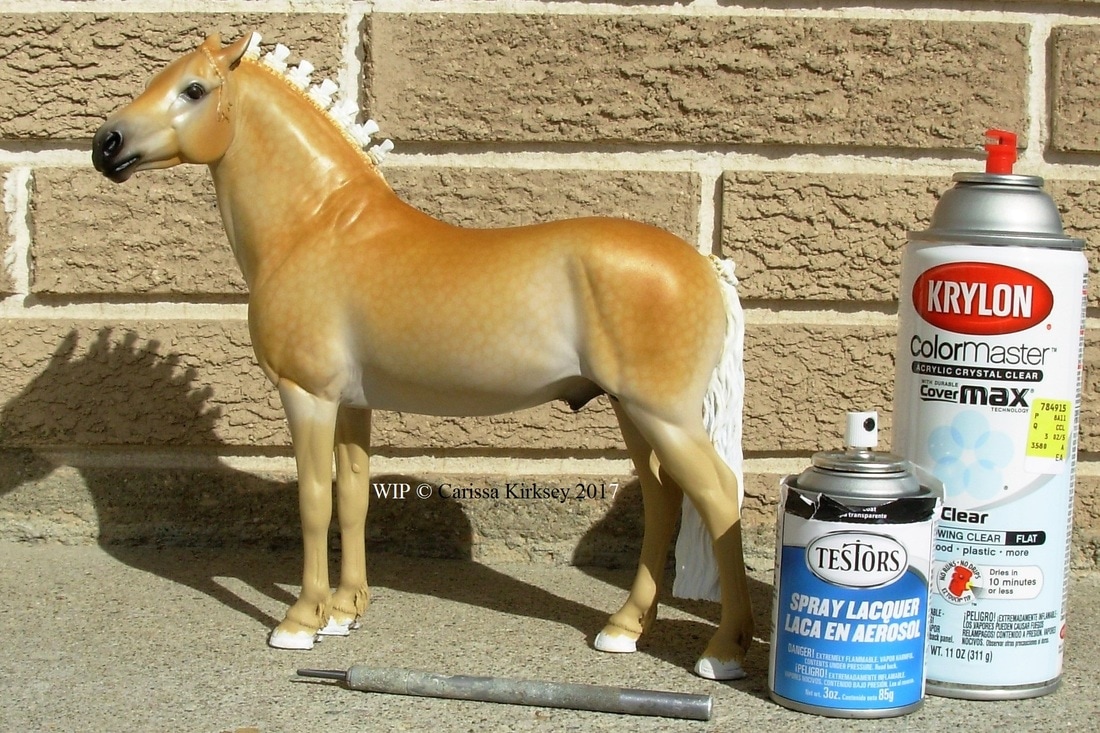
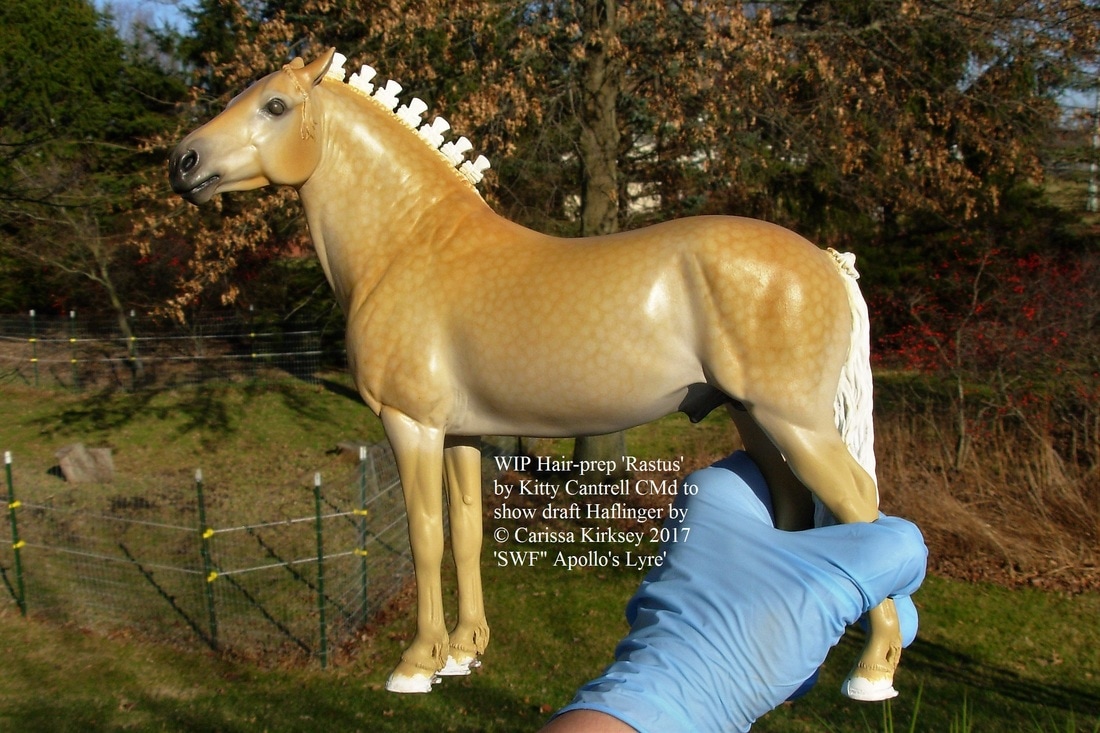
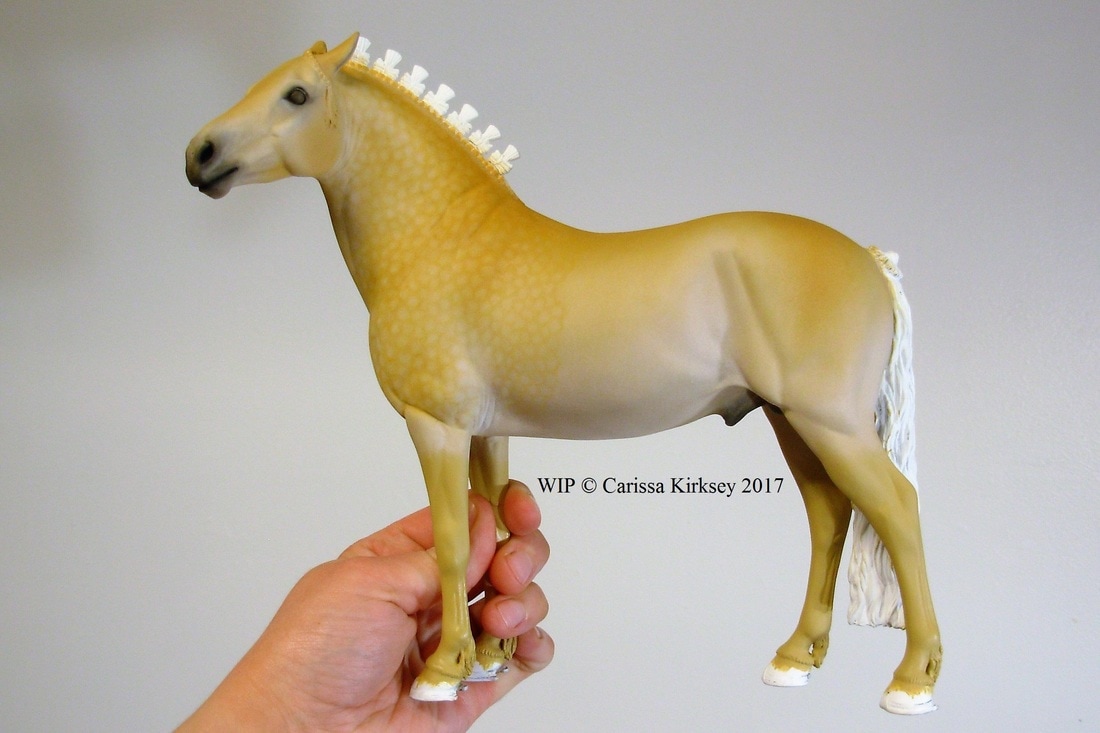
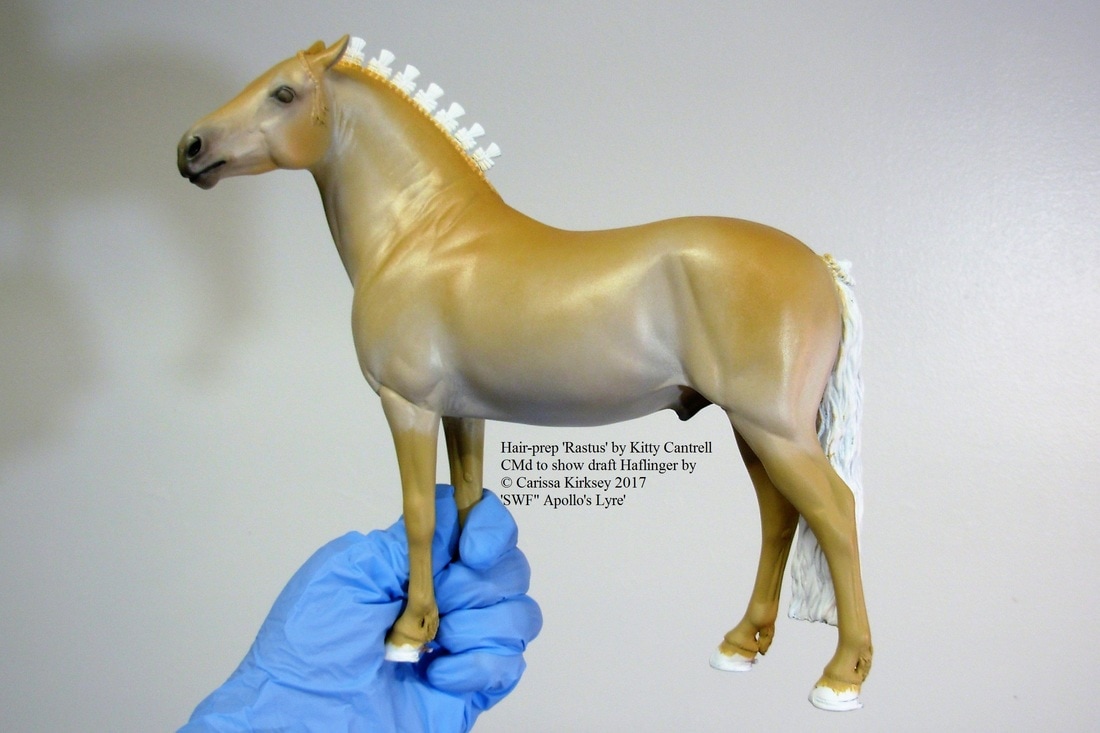
The color is very very close to accurate, but he's still a little bitty-bit dark because I didn't have a lamp on the left & was far too lazy to tear my workroom apart to move one over there. Still, these are some really good pictures of him!
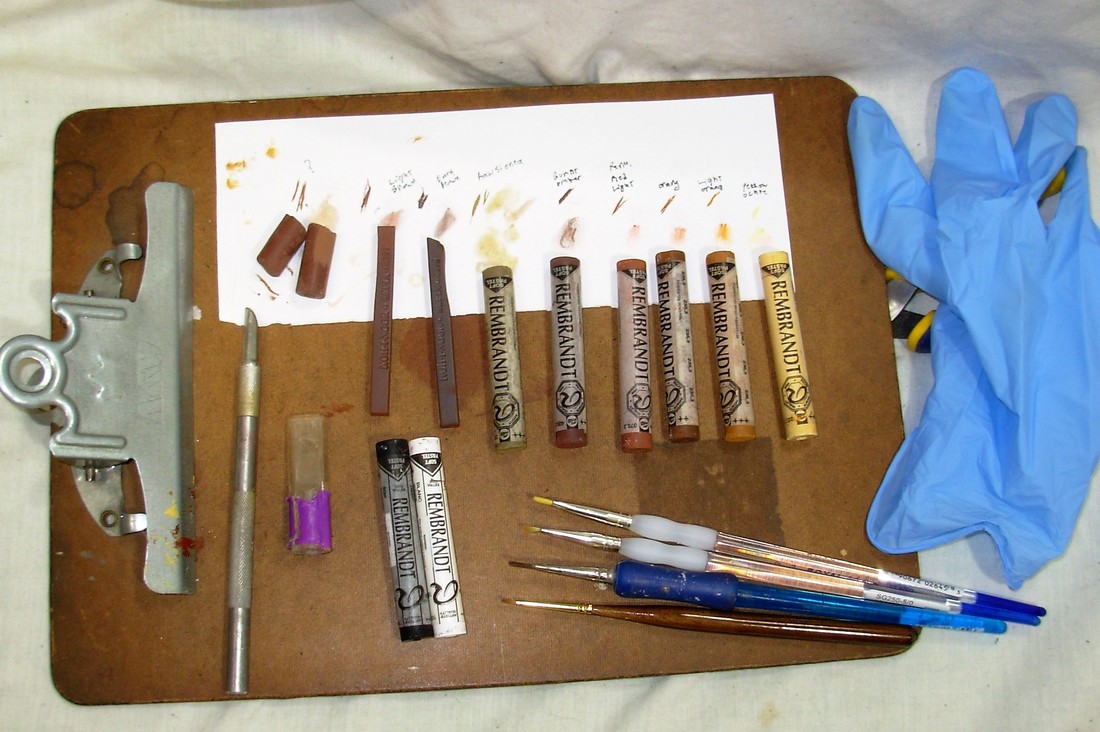
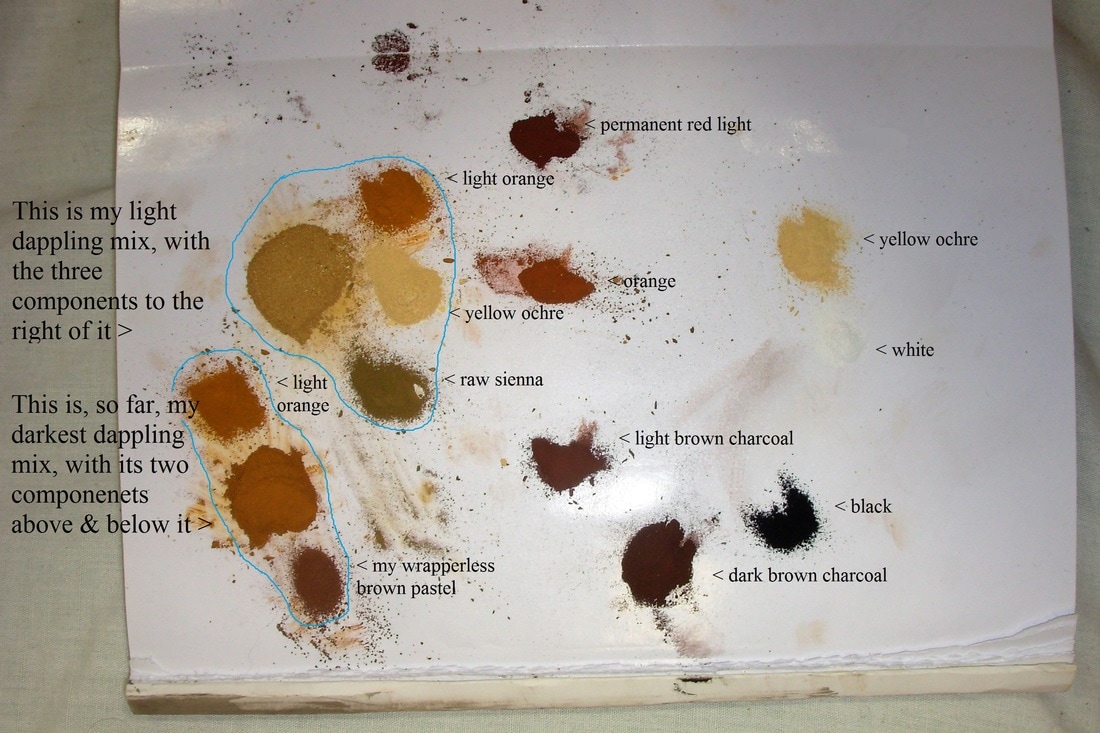
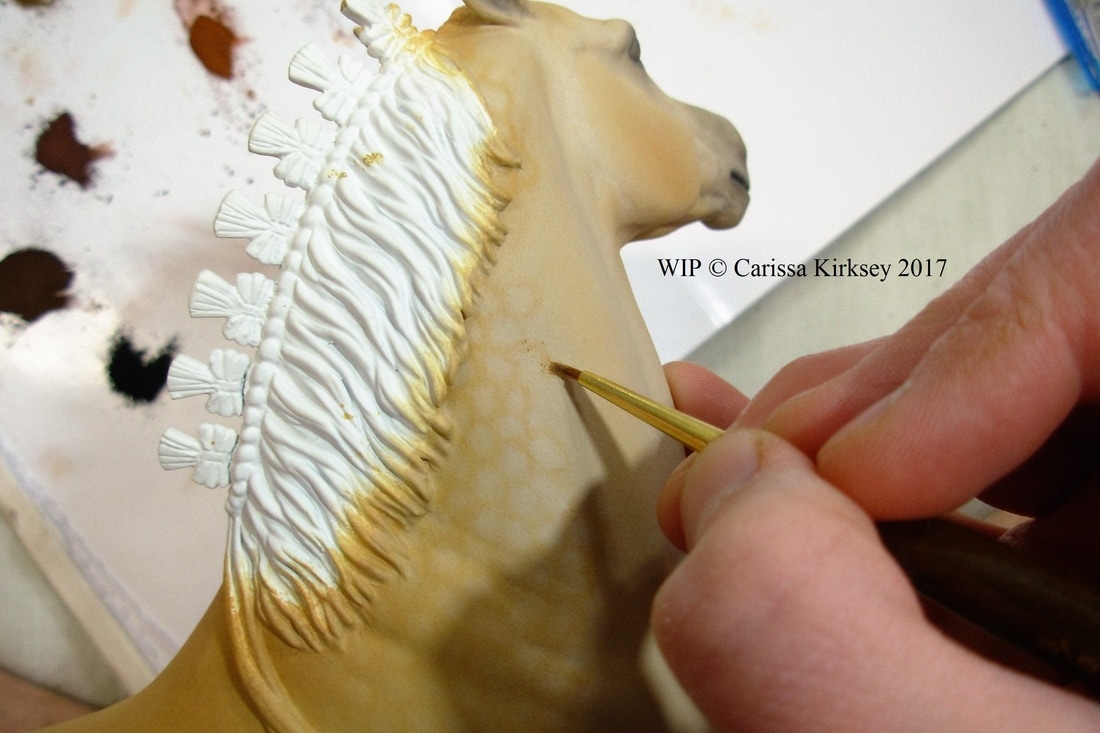
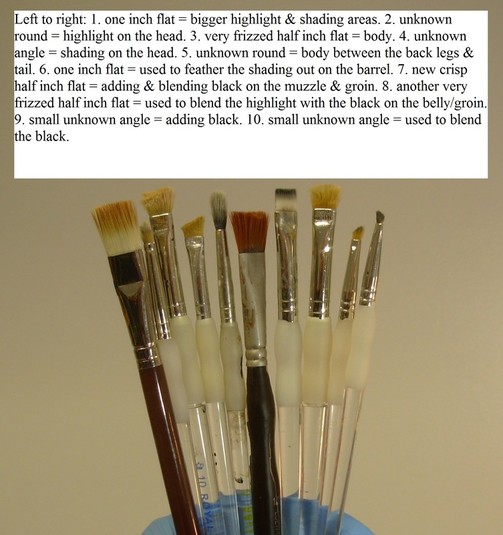
 I am incredibly pleased with Rastus, he turned out exactly how I wanted him & with no fuss at all (I guess under that grumpy exterior, he's really a nice guy!). I learned how to use pastel to add dapples & other soft layers over my oil coat with this guy, techniques that I plan to add to my daily painting repertoire. I'm really looking forward to showing my fella on Saturday at the New Year's Bash!!
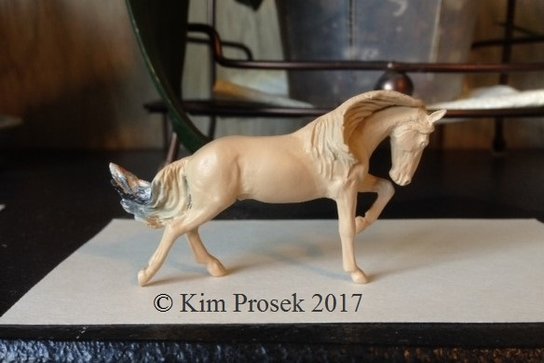
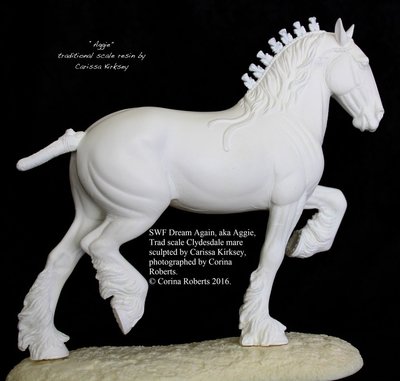
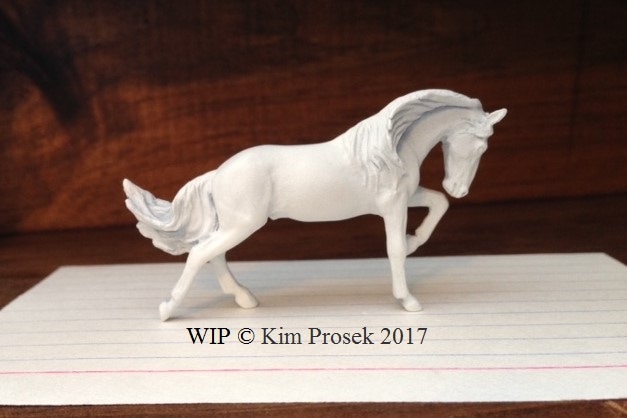
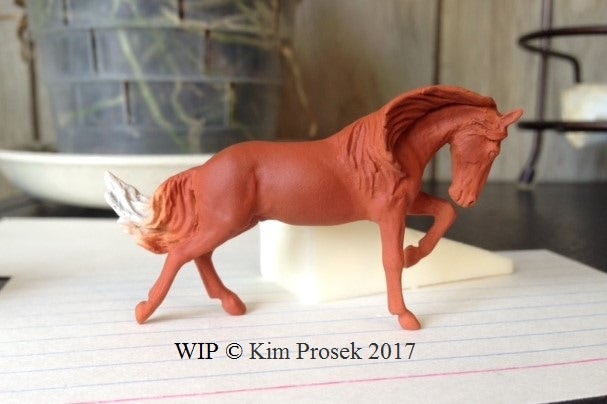
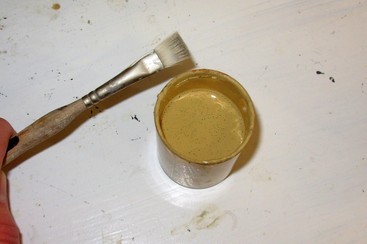
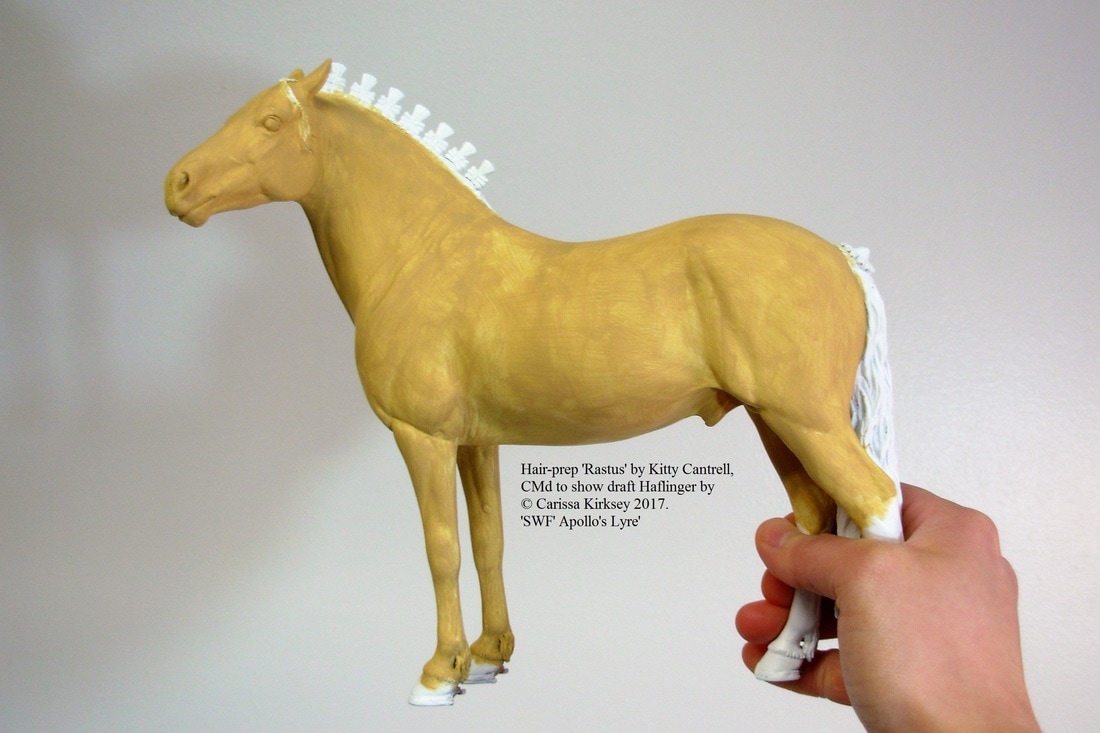
 To commemorate his completion, I put together a slideshow of him from raw AR to finished showpiece: 
 I'm not the only one who has a finished NaMoPaiMo project to show off today. I would now like to hand the screen over to Kim for her last report on Albus!

NaMoPaiMo Update Week 4
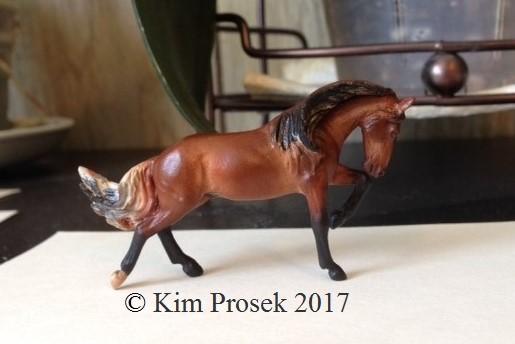
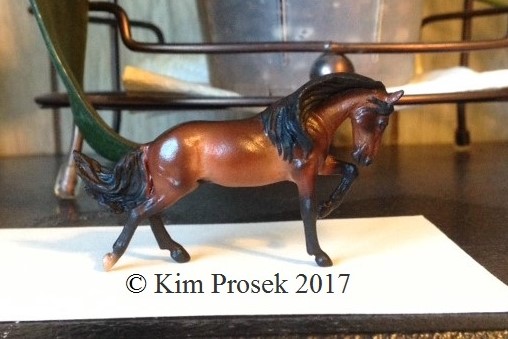
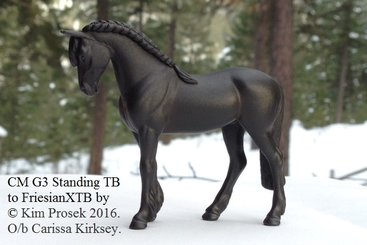
Albus is complete!
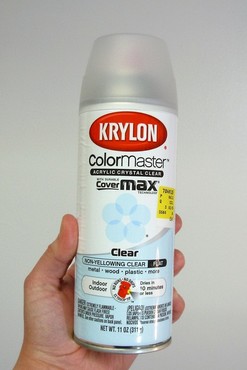
He got his multiple coats of sealer, along with having his eyes, nostrils, and hooves glossed on Saturday.

 A big thank you to Jennifer for hosting NaMoPaiMo! And to Carissa for encouraging me to participate and sharing her blog with me :) Thank you also, to all the artists who shared their wisdom in such wonderful tutorials. What a great community!

Kim Prosek


  You are more than welcome Kim, & I totally agree with you on what a great community we have in the model horse world! I think your Albus turned out fabulous too!
 Speaking of finished ponies! Coming in under the wire is Jennifer's Aggie! & ohhhhh my!!! For being so leery of oils, & about ready to toss in the paint brushes at one point, this girl has turned out to be amazing!!! Please please go look at her Aggie on Jennifer's blog here!!! I can not believe she's not more practiced at painting, let alone in oils!! This horse looks so good!! 
 
Thank you Jennifer for hosting the NaMoPiaMo! It was truly something special! ...I hope it didn't drive you too crazy! & congratulations to everyone who participated in NaMoPaiMo!
 Go forth & paint ponies for the world! 

0 Comments

NaMoPaiMo Day 27: Mission Accomplished!

2/27/2017

2 Comments

 
 Yesterday was details day for Rastus! M&T was painted & shaded in oils & a little white pastel. His white face was finished off with my 'ticking' mix (watered down white gesso, burnt umber acrylic, antique bronze Pearl-Ex, & gloss acrylic varnish) & pinked with a little burnt sienna oil. & his decorations were colored in with classic gold Precious Metals Premium Leafing Paint, & two shades of 'verdigris' blue acrylic mixed to my taste with metallic acrylic, platinum Precious Metals, & silver Pearl-Ex added for shimmer.
 & just so you know...

Picture
 All those decorations...
Picture
 Flowers, roll, roll tails, forelock, & bow... 
Picture
 Took about six hours to finish! :P
 But, by this morning this is what I had! :)

Picture
 Please ignore the stupid quotation mark that slipped in unwelcomed to my copyrighting this round! }:|
 & after several more meticulous hours of carefully spraying the last layer of finish, & making sure it was flawless (cursed dust & hair!!), & adding that last detail of realism; glossing eyes, nostrils, & feet, & varnishing M&T & the decorations, I am happy to announce that with a day to spare, Rastus is FINISHED!!!
 May I introduce to you my newest addition to my showstring...
SWF Apollo's Lyre.
 I plan to try to get better pictures of him tomorrow, & eventually I will get good & proper show pictures of him. Right now, I have other horses to get to: I will be attending the New Year's Bash Live on Saturday & would like to have a few more pieces finished before then. If you will be at the Bash, feel free to drop by my table & say hi to Rastus!
 Happy last few hours of NaMoPaiMo everyone!!

2 Comments

NaMoPaiMo Log: Day 23

2/23/2017

0 Comments

 
 Getting cloooooooser! ;)
 Rastus got the thin start of his white face mapped in a few days ago. As of yesterday he's looking back at me.

 The start to various parts of his hair was also added yesterday.
Picture
 Today His legs finally have a start on catching up with the rest of him.
  Also blacked his feet which are blessedly show polished; no growth rings to detail! 
Picture
 SO! Finish shading his legs, add chestnuts, finish shading his topline, paint his hair, paint his decorations, finish off his white face & black feet, sign him, seal it all one last time, gloss eyes, nostrils, hooves, & he'll be done! We might just make it before the end of February!

 & now for the latest from my friend Kim!

NaMoPaiMo Update Week 3

 Hi!
 Just a quick update on Albus.
 After binge watching Netflix for most of the weekend I figured I should finish painting the details on him. Albus is almost complete!
 
 This week I'll put a few more coats of matte sealer on him, gloss his eyes, hooves, and nostrils and he'll be finished. :)


 Kim Prosek


 Wow! I think he looks fabulous Kim!!! :D
 
 We're closing in on the end of NaMoPaiMo, so tune in for more updates soon!
 Happy painting all! 


0 Comments

Closer & Closer...

2/20/2017

2 Comments

 
 Shaded his topline & a few low areas last night. This morning he got a couple layers of finish. I alternated Testors, Crystal Clear, & Testors this time. 
Picture
 I think he's going to move pretty fast from here on out. I am exceptionally pleased with him so far!
 Stay tuned! The NaMoPaiMo fun continues! :)

2 Comments

We Have Dapples!

2/19/2017

0 Comments

 
 FINALLY! Dapples are laid out & sprayed! At long last, onto the next step!
Picture
Well, you finally get to see a decent color pic of Rastus! I did tweak it a little to make it even more accurate.
Picture
 P.S.


 Tip:

 ...Don't knock your pastel mix over... :P


0 Comments

NaMoPaiMo Updates

2/15/2017

0 Comments

 
 I've been quiet on here for nearly a week now. Rastus is going quite well! Still working on dapples, & being distracted by other ponies to paint & CM! I mostly just have his right hip to dapple yet, plus a few random ones to add here & there, & darken, lighten, & fade some, all mostly on the right side. Once the dapples are laid down & caught up with the left side I will spray another layer of Dull Coat & continue darkening them, either with more pastel or with oil, haven't decided yet.
 Here's what I have so far.

Sweet mercy, these are HORRIBLE pictures!! I always seem to take pics after sundown, & my studio lighting makes my camera catch him looking stark yellow with ring dapples! Yich! In person he is a rather pleasant honey chestnut with nice soft dapples. Someday I will get a true picture for you! :P 
 I'm pretty happy with him! He's being a surprisingly easy pony to paint so far! Good boy Rastus! ;)

 & now for another update from my friend Kim!

NaMoPaiMo Update Week 2

 Hi,
 I have to say I'm loving all the tutorials that are being posted. I love to see all the different methods and procedures and I've taken a little something from each. I almost feel as if I'm cheating! I will definitely be trying out the toothbrush fleabits and colored pencil method for more body work. I've used pencils on hooves and mane/tails, but I think I might try dapples with them!
 Well, Albus got prepped and primed again this past week. Friday, I put a basecoat on him.
 I'm glad I listened to my gut and started over on him. Who knew bays were so difficult! But, mistakes are a great teacher and I'm grateful that this challenge has made me face painting a bay.

Picture
 Saturday and Sunday consisted of many, many layers of pastels. Van dyke brown, burnt sienna, and a mixture of the two.
 Black points on his legs were started with acrylic. And gone over with many layers of black pastel.
Picture
 And finally, Albus is to the point where just the details are left to paint.
Picture
 Starting over with a much lighter base was a good call for me. With the original dark base I had, I couldn't figure out how to build his color. By going lighter, I was able to work my way up to the bay in my reference pic.
 Ok, enough rambling for now. Thanks again to Carissa for letting me bend her ear and her constant encouragement to keep going!

 Kim Prosek


 Very welcome Kim! Thanks for updating us all on your pony, sorry it took me a couple days to get it posted! I think he looks fantastic!! & I couldn't agree with you more on enjoying the tutorials folks have been sharing this month!

 Check back for more updates soon! Happy NaMoPaiMo!

0 Comments

NaMoPaiMo Day Eight: Dappley

2/9/2017

0 Comments

 
 The NaMoPaiMo fun continues! I have been pastelling dapples on Rastus &, pastel or oil, dapples take T I M E. *sigh* It is going quite well though & I am happy!
 This is all new ground for me, pastelling, & only the third time I've tried it for dappling, or anything else for that matter, so I am more or less winging it. But I'll share what I am doing.
 I got several different colors of pastel the other day, not being too sure what I would need or use. I came home with black & white (which I knew I would need), burnt umber, permanent red light (doesn't that sound like your worse nightmare at a stoplight?), orange, light orange, & yellow ochre, & I already had raw sienna, an unknown, wrapperless brown, & light brown & dark brown charcoal.
 Before ruining Rastus, I tested out my colors on a piece of paper & wrote their names over them. Here's a picture of my test sheet, brushes, razor, & glove that I am using.

Picture
  I'm using different brushes for different colors, & different uses; I've actually added a few since I took the above pic.
 I shaved down a bit of all the colors & took ones I thought would work best to mix the colors that I am using at the moment. I have a light first coat color, which is a mix of light orange, yellow ochre, & raw sienna. & a darker color that I am using for the bolder dapples, it is a mix of light orange & the mystery wraperless brown.  

Picture
  To start, I get a little of the light mix dust on a 18/0 round & brush on some circles. Any way you do them, you do not want perfect round circles, or anything in any sort of a straight line, the eye will reject them. Instead, stagger them, make them vary a little in size & shape. This will look much more realistic when finished.
 I brush on the first light circles, brush off the excess, & since I want them to fade out the further down on him they go, I will start darkening them, not quite to the furthest edge, with another coat of the light mix. He is also going to vary in shade in different places as per the real thing (& I like a well contrasted paint job too), so it is not uniform in any way. 
 Next I will go over the even darker spots with the current dark mix & a 5/0 round (I'm just using what I have in the way of brushes). It absolutely will go darker, but I am not sure if I will do it with with pastel, or oil, or maybe a combination of them in layers. It's an adventure!  

Picture
 This is what I have so far (below). Don't scream, it is not that obnoxious in real life; the lack of daylight & strong indoor lighting made this pic look much more lurid than it is in person. Also a lot more 'polka-dotty'! :P Just bare with me! It will turn out well! :) 
Picture
 I will continue with his dapples today, so check back for a new post soon!
 Happy painting!

Post Script:

PictureThis is Jennifer's actual Aggie :)
 I don't know how I've gone this long without mentioning it! But I am sure going to change that right now! ;)
 I have to point out that Jennifer Buxton, who is of course the creator of NaMoPaiMo, has chosen a SWF Dream Again aka Aggie resin, sculpted by me, as her victim of the month. I couldn't be more pleased to see 'my baby' in the lime light!
 Jennifer is trying her hand at oils, & so far I think she has done a fantastic job on Aggie! Check it out on Jennifer's Breymere Custom Saddlery blog here!
 Aggie is still available for order up/up. Please see the 'Artist Resin' page for further details!


0 Comments

A Little Experimentation...

2/7/2017

0 Comments

 
 As I mentioned yesterday, I have been lightly touching on the world of pastels. What I'm interested in doing with it is dappling & I have used it on a few minis with great success. I wanted to see if it would work as well on a Trad, & Rastus is the lucky guanine pig. I had planned on testing this out yesterday, but of course, the few pastels & charcoals I have here were the wrong shades to even pretend to match him. So this necessitated a voyage to the one craft store in my area that has pastel chalk. ...Rastus came along to make sure I got the right colors. 
 After some errand running, I finally got home to play with my new acquisitions. With a smidgen of trial & error to mix the right color & find the right brush, I am pleased with the results so far.

Picture
 There is still going to be plenty of tinkering with it yet, so don't judge them too harshly! I have a pretty good idea of what I am aiming for, & how I will achieve it. I'm looking forward to continuing with them tomorrow, so check back again!
0 Comments

NaMoPaiMo Update & Guest Post!

2/6/2017

0 Comments

 
PictureMy 'KP Sonic' that Kim painted & photographed both!
 Continuing on the NaMoPaiMo journey of Rastus, Saturday, day four of NaMoPaiMo, his oils had dried & I sprayed him in two coats of Testor's Dull Coat to seal it on good. I, for one, struggle with dust, especially on these light colors, they are like white dress pants; they show EVERYTHING! It doesn't matter how careful I am or what cleaning I do, dust & particles always manage to find their was onto paint & finish. So I spend a good deal of time scrupulously going over my pieces before & after spraying, carefully picking off unwanted specks with my carbide scraper & paper quilling tool (used for sculpting!). Thus was his day 4 progress! Not much has changed to look at him, so pictures are not really needed.
 I spent Sunday playing with a few other model projects, so Rastus got a day off. Today I plan to experiment; I have just started tentatively playing with pastel & charcoal for dappling on some minis, & that has rewarded me with some fantastic results! Now I want to see if it will work on a Trad. I have a few pastel chalks & charcoals laying around, but certainly not any sort of a rainbow, so I am not even sure I will have the right shades. But we shall see! ;)

 Now I would like to introduce my friend Kim Prosek of MT; a pastel model horse artist, who sells her creations on eBay from time to time. I really love her work & own one of her pieces! He has, in his yet short show career, become a MEPSA International Reserve Champion for me at the last Champ show!
 Kim is also of the non-facebook crowd, so I offered to share my blog with her to showcase her NaMoPaiMo progress as well! Her victom, er, subject, is an 'Albus' sculpted by Maggie Bennett, which she plans to be a bay.
  Without further ado, here is Kim:


NaMoPaiMo Update Week 1

 Hi!
 I thought I would give a weekly update on the "progress" of Albus.
Needless to say, it has been one step forward, two steps back (or maybe 3 or 4). I had him primed and ready to go for this weekend after much fighting with static. It has been cold and extremely dry here in Montana, so every hair and fiber managed to find its way onto him.
Picture
  Saturday, I got a basecoat down (woohoo!) but....I hated the color. What a horrible, garish, not natural color! So I let him set.
Picture
 Sunday, I tried a layer of pastels to see if he could be salvaged. I wasn't feeling it, at all. I decided to bite the bullet and strip him (hence the yellow ziploc).
Picture
 Everything came off beautifully. And I mean everything. All the holes and seams I had filled, I had to refill because the bondo got stripped out. *sigh* Well, I've refilled all the holes and have him primed again! My strategy this time is going to be a little different. I'm going to start with a much lighter base and build the color up with pastels. I'll let you know how that goes. ;)

 In the meantime, I've been working on another MM. Maggie Bennett's micro 'Ground Effects'. While I was basing Albus, I got Effects basecoat done on Saturday too. Sunday, while Albus was off to his spa day *ehem*, I got Effects markings drawn in and a good chunk of the color filled in. While she isn't my NaMoPaiMo entry (I wish she was!), I'm extremely happy with her so far. She still has a long way to go but I'm looking forward to it. I'm hoping some of Effects good looks will rub off on Albus!

 Thanks to Carissa for all her patience and advice!

 Kim Prosek

 You are very welcome Kim, though I don't know how much help I've been! Your Ground Effects looks great! & I'm sure Albus will turn out well, round two!

 Stay tuned for updates on Rastus & Albus! Happy painting all!

0 Comments

Oil Painting Recount

2/3/2017

3 Comments

 
 As promised, here is the full account of how Rastus got his first layer of oils yesterday. As I said in an earlier post, I mix all of my paint in bulk so I don't have to mix a new batch every time I want to paint (it takes a hunk of time to do it!), thus I don't have any 'how-tos' on mixing paint for you. But I can describe it.
 But first, remember how I said that Haffy blond does not follow my usual painting recipe? Usually in oil (or at least how I do it) you start with a layer of body color; it is the 'middle' color of your horse & fairly close to your base coat color. Then to the high points of the horse, such as the muscle masses, you add highlight; this is the brightest color of your horse. Then to the low points of your horse, such as muscle grooves, you add the shading; this is the darkest color of your horse beside any dark skin or black points such as on bay. With this in mind, I can shift up & down the 'scale' of color to do different shades & colors with a lot of the same paint. What is body for one horse may be shading for a lighter horse. What is body for another could be highlight for the darker colored horse. Does that make sense? 
 With that said, here is my composite palette for Rastus:
Picture
 Above is my "companion dilute" mix; it is my highest 'scale' of color for painting 'reds' (which is a portion of buckskins, palominos, & duns). I use it with some of the colors from my "bay/red" mix (below) for the aforementioned colors.
  Now below is my "bay/red" mix. This is what I use for all but the occasional odd shades of bay & red, & also for golden palomino & buckskin. Most of the time the red brown is the body, the 'gold' is the highlight, & the dark brown is the shading, with the black for thin skinned areas & black points. With a little variation of the color of the base coat & amount of what color oils you put over it, you can get several different shades out of this. & similarly, by changing the color of the points on the exact same paint job you can get gold palomino or a red chestnut, or a liver chestnut or rich bay.
 In most cases you start with whatever the middle color may be & work 'out' to light & dark. Then after the first layer of oils has dried, you can add more depth to it with either another light layer of the highlight & shading, or you can go darker with black for the shading or lighter with the 'yellow' for the highlight. It really does take a sense of learned intuition to a point to know what to do to get the result you are looking for. (Not what you wanted to hear, I'm sure!) I will have to post a session of painting a bay at some point to show how a 'normal' color goes! 

Picture
 As for mixing color, that would be a challenge to explain without doing it & taking pictures to illustrate. I will say that my brands of choice are Van Gogh & Masters Touch (the Hobby Lobby house brand). Colors vary from brand to brand, so I like having both around. I have also had one brand (Winton) that was very lurid in its colors & definitely affected my results. I avoid it, btw.
 I only use six colors of oil: titanium white, carbon black, burnt umber, raw sienna, burnt sienna, & naples yellow, but for blacks I will add a couple & use some blues. I also add a good deal of Pearl-Ex powder, which is a metallic powder that adds shimmer to your coats. It also helps to dry the paint. Which leads me to the fact that I do not add any dryer or anything else to my paint. Honestly, they scare me. Have you read those bottles?? eap! It may take a day or two, but the paint does dry fine without it. Plus, I always wonder if my palettes would last as long (I pop the mixed paint in the freezer!) if it had dryer in it. I can use a bulk mix for more than half a year.

Picture
My various oil paints & Pearl-Ex colors.
TIP: Use binder clips to hang your oil tubes, they are MUCH more manageable that way!
 I honestly can't remember what went into the mixes above, I did them a couple months ago, I can give a fair guess though: Red brown would be mostly or purely burnt sienna with antique bronze &/or aztec gold Pearl-Ex. Dark brown would be burnt umber with black & antique bronze & carbon black Pearl-Ex. Gold would be mostly or purely raw sienna with aztec gold Pearl-Ex. Black is carbon black & nothing else; with out Pearl-Ex it looks even more black (since it's not bouncing any more light). Both the yellows, though they are a little different, are naples yellow & white with aztec gold & micropearl Pearl-Ex (NOTE: I much prefer pearlwhite to micropearl for anything but I am having a hard time getting it.) White is white with micropearl Pearl-Ex. Cream... that one's going to be difficult to pinpoint. It is white with either a touch of burnt umber &/or antique bronze Pearl-Ex, but don't hold me to it. 
 All this is mixed with a palette knife on a sheet of palette paper, which is like super strength wax paper; you don't want anything that will soak up the oil in your paint, so don't use paper or even wax paper for your palette. Fold the paper in half & mix on one half & the crease only; then you can fold it over & put it in a ziploc in the freezer for keeping. (Make sure to write what the color is & when it was mixed on the paper.) Note: you don't need to worry about defrosting your oil before painting, it does not freeze solid & thaws out very quickly. Note number two: Use a clip board to hold your palette paper for easy use. You can even clip the other end to the board with a cloths pin or binder clip. I use mini hardware clips (those orange tipped 'industrial cloths pins!').
 But anyway! Back to Rastus! HIS body color was the cream from the companion dilute mix.
 I have quite an arsenal of brushes & some of them are well broke as you can see below! Unlike with acrylic, frizzy is an asset in oils! It is easier to blend colors once they get frizzy, but new ones do work.

  The name of the game with oil is THIN. & to clarify, I mean thin layers, NOT thinned paint. You do not want or need gobs of paint over your base coat, which is one of the reasons you should make an effort to mix your base close to the body color you are aiming for. You don't want to have to fight against the base color, this will lead to a thicker oil layer, & that is just trouble.
 Start with the body color; I chose a well loved half inch once-was-flat. Touch just the tip of the brush in the oil color, work it in the brush on the pallet paper so that it is even on the brush, & then sort of scrub it onto the horse. You don't really stroke with oils, that just leads to streaky color as a result. You use the tip of the bristles,  this is what frays out my brushes so splendidly.  

 Work in sections so you always have a hand hold: start with the head, neck/chest (or combine those three), shoulders, forelegs, belly/groin/inner thighs/butt, barrel, hindquarters, & finally back legs. The tail is usually my last handle, but with Rastus's calm tail I have to use the legs, so they will be painted later. 
A note on the glove: my hand gets sweaty as I work, which can make the base sticky, & that with all the handling can wear down the tooth of the base, so I wear a glove to protect the horse.
 We're back to not following the recipe with Rastus: Usually I base whatever section I'm working on, highlight, shade, & move to the next section, so each sections is pretty much finished once I move to the next, but blond is a special case. I bodied the whole horse, then went back to highlight with the white mix. & again, I usually highlight all the high points, but with blond I did only his belly/groin/inner thighs/butt, lower barrel,  flank, back of thighs, behind the elbow, chest, high points of the neck, muzzle, eyes, & high points of the face - excluding the cheeks. This was done with the same method of kind of stippling the paint on with the brush tip, using the two brushes below.
 When you add highlight or shading, you are basically mixing paint ON the horse, which was a revelation that really did help my painting skills. You add the most (which is not much really) to where the color is brightest, & then feather it into the body color, in essence mixing the color more & more until it is indeterminable where one ends & the other begins. This is a skill, but trust me, you can learn it!

 After adding the highlight, I added the shading in increments; building it up in strength starting with the gold mix & the same one inch flat that I used for the highlight (cleaned, of course!). Breaking the rules with shading the same as highlighting, I added the shading mostly like a 'blanket' over the top, covering his topline, down his hips, barrel, shoulder, & crest, & catching some of the low points of his neck. On his face I did down his nose- stopping just short of his muzzle, his cheeks, & lightly catching the low points, but avoiding his eyes. Being pangare or mealy, the muzzle & eyes will be light.
Picture
 The shading was blended with the same stippling technique. After a couple go-overs with the gold, I took it up (or down?) a notch & added some red brown to the boldest colored areas. Even with the flash it's hard to see much difference between these two pictures, but trust me, in real life, there was. Also keep in mind that I will be building up dapples over this, so I don't want the base for the dapples too dark.
Picture
 Last thing I did was add black to the thin skinned areas. Same technique used here, only smaller. I blended it in pretty well so that it is pretty much grey. Next layer I do will bring the darkest areas up to black. If you look at a pangare, the thin skinned areas fade out to grey pretty far, so this was what I aimed for as it is hard to fade to grey with a second coat.
 Last of all, here is a group photo of what brushes I used:

Picture
Sorry for the somewhat vague IDs here... I am not really up on my brush species. Also I tend to scrub off the printing on the clear-handled ones because if you hit that on the horse you get an instant & unfixable blue streak on your work! I can tell you that I mostly use synthetic bristles, but natural (sable?) brushes do make an appearance from time to time (that dark half inch flat).
 Now for a moment on cleaning brushes. I don't use turpentine, it is nasty stuff & if any is left in your brush it will screw up your next painting session. I don't even use brush soap. What I do use? Dish soap & warm water under the tap! Works just fine! I have also used saddle soap which works just as well. If you're tired after painting & want to cheat, put your brushes in the freezer, that'll buy you some time. & in the event you accidentally fossilize a brush, get some cheap canola oil from the grocery, put a little in a jam jar, & soak the bristles of your brush for a few hours or a day & wash out as usual (wash it well though as any left up in the brush can thin out your paint while you're working).  

 Now for the finale, a couple slightly better pictures of Rastus. :)

Chillin' in the China cupboard!
TIP: I will sometimes carefully put a drying horse under a CLEAN plastic bag to help keep any dust off.
 As of today, his shading is dry, but his highlight is not. In a day or two I will be able to give him a layer of finish & continue working on him!
 Until then, happy NaMoPaiMo all! 

3 Comments

NaMoPaiMo, Day Two:

2/2/2017

0 Comments

 
 Well, we've come to the end of day two of NaMoPaiMo, & Rastus is right on schedule! I am tired & cross eyed, so tomorrow I plan to post the in-depth narrative of his first layer of oils. In the meantime, here is his progress!
 His body, head & neck are completely oiled; body, highlight, & shading. His legs are still bare base coat & will have to catch up later... I have to have SOME sort of handle as I paint! ;)
 I had a heck of a time getting a pic that showed true color, but this one is pretty close.
Picture
 The flash showed a bit more depth, but a little too much contrast.
Picture
You can really see the Pearl-Ex at work on his shoulder, shining in the flash.
 I'll get better pictures tomorrow in the daylight.
 Happy painting everyone!!

0 Comments

NaMoPaiMo; Let The Games Begin!

2/1/2017

0 Comments

 
PictureNaMoPaiMo logo designed by Margaret Balch & used with permission.
 Annnnddd they're off!! NaMoPaiMo started today, & I dare say, all over the world model horse artists were busy at work! I had primered my Rastus yesterday to have him all set to go today for some basing! Since I plan to record his progress on here, I thought I would take the opportunity to show a little of how I paint.
 Now, since Rastus is going to be that typical pangare blond of your everyday Haflinger, he kind of deviates from my normal painting 'recipe', but he'll show how I paint a dappled blond at least.
 As I said, I sprayed him in primer, my brand of choice being Rust-Oleum Painters Touch flat white primer which I get at my local Hometown hardware store in Wooster.
 Even though it's winter, as long as the horse & the can are both house temperature, & it is not ridiculously cold, you can still primer & finish in the cold months. I have sprayed in upper & mid teens & had success. Shake the can while still inside. Shake it for two to twelve minutes! The longer time for new cans or cans that have sat for a while. Make sure the ball is rattling freely, & shake the can in all angles, including upside down (with lid on). Once adequately shaken, step outside & start the can, spraying out the first few seconds of primer/finish; this is to spray out what is in the nozzle/spout that would not shake up well. Then come in, grab the horse, step out & spray what you need & come in. Put the horse somewhere you don't have to smell it (a spare room or garage, crack a window if needed) so it can dry, & then step out to clear the nozzle by turning the can upside down & spraying until only gas comes out. This last part does not apply to the Rust-Oleum since they are an any-angle spray can & will work upside down as well. As a note; obviously, don't spray in snow or rain/drizzle as it will simulate fish-eyeing, & don't spray in great wind as it will swirl & more likely hit you than the horse. Always work in open air, & a respirator is advised. (Do not use a dust mask though: it will catch the fumes under it.)


Picture
Can you see why I write CLEAR on the cap of the finish? Could we make these two cans any more similar??
 As you can see in the pic above, there is matte finish of the same brand; for some reason after priming Rastus, two mysterious bright blue, sandy textured spots popped up on his tail; it reminded me of verdigris. The only thing I can think of to explain it is that there was some sort of reaction with the aluminum armature mesh I used to sculpt his tail, since where one spot appeared there was some mesh pretty close to the surface. I have no idea why it did this, I've never had it occur before, & it can't be the aluminum since his shoes are aluminum too & no problems there. Ah well, who knows! But my initial attempt to remedy the problem when it popped up again after scraping it off & primering over it once more was to add a layer of Rust-Oleum matte finish & then another layer of primer. It helped, but didn't stop it. I wound up putting some more epoxy over it. Problem solved.
...I hope!

This is the stage that Mom calls 'Ghost horse'!
 After that, he was ready for the base coat! That was his first official NaMoPaiMo progress done today. If it isn't apparent yet, I paint mostly in oils, but oils are not the soul medium when you paint in oils! For starters, the first step is a base coat of acrylic. In every color I paint, I mix up bulk batches & constantly have them on hand, so I will not have any pictures of what goes into mixing any of the paint I'll be using on Rastus. My buckskin/palomino/blond/dun base is Americana 'Camel' color acrylic, with a dash of Liquitex clear gesso for tooth (not too much though, or the finished piece will look 'sandy' in texture when finished), & thinned with water to a consistency that just covers the side of the paint container without beading up.
Picture
Tip: look for condiment containers at your dollar store, they are basically the same as paint containers but for a fraction of the price!
  I do not have an airbrush, so I do everything by hand. With a half inch synthetic flat my choice weapon for this battle, I start painting the base on in numerous layers, starting at his head, & going as far back as I can while still leaving myself a 'handle' bare of paint. (Eventually I will invert the process to catch the back legs.) Paint a layer, wait a smidge, paint another layer, wait a smidge, repeat, repeat, repeat, take a break for it to dry a bit, then come back & repeat, repeat, repeat... Always changing the directions of the brushstrokes with every layer to keep from building up ridges. Also, never apply more paint at once than you can brush out before it dries; the goal is many thin layers to avoid any brushstrokes. The base coat is finished when there are NO thin spots left. Trust me, if you leave a thin area, you will see it in the finished piece.
Picture
I'm not precisely sure how many layers this was... 5-7 I think. So, still pretty thin & streaky.
 I have gotten into the habit of spraying a layer of finish over the completed base coat on some horses; this ensures that if some of the base gets worn off as I handle the horse, it does not leave me with an annoying hole of color to fill; it's not impossible, but it is a headache I wish to avoid. I use three different finishes in day to day use, today's choice was Krylon Crystal Clear flat, again from the hardware store, so it looks a bit different from what you find in the art aisle. ...I've never looked, it's probably cheaper too!
Picture
 After that dries, I then put down another two to four layers of base over the finish since, depending on which finish I use, it will either suck up the oils & make it hard to blend, or it will be too slick for the oils to hold onto &, make it hard to blend. This one falls more towards too slick. The Rust-Oleum is definitely slick, & Testors Dull Coat is the one that will suck it up like a sponge.
 With those last few base layers, the horse is completely based & ready to start with the oils once dried. I probably could have started oiling him today, but it's just as well to let him dry out well overnight. Tomorrow I will start his transformation from flat yellow-tan, to Haffy blond! Stay tuned!

Base coat complete & ready for oils!
 Be sure to check out the latest about NaMoPaiMo here.
0 Comments

    Author

    Ramblings & tutorials of a model horse artist.

    NOTE

    Just a 'public service notice' to any of my blog readers; Since there's not really any way to 'follow' a weebly blog, if you shoot me an email (sprucewoodfarmsstudio at gmail dot com) I will add you to my blog announcement list & will send you an email when a new post is added. :)

    Categories

    All
    BreyerFest
    Contests
    For Sale
    Guests
    Holly Grails & White Whales
    In The News
    Live Show Reports
    Mail Call
    NaMoPaiMo
    NaMoPaiMo 2018
    NaMoPaiMo2019
    NaMoPaiMo 2020
    NaMoPaiMo 2021
    NaMoPaiMo 2022
    Nature
    Newly Finished
    Personal Collection
    Social Meda Posts
    Tutorials
    WIPs

    Archives

    February 2022
    January 2022
    August 2021
    March 2021
    February 2021
    January 2021
    February 2020
    February 2019
    January 2019
    April 2018
    February 2018
    January 2018
    November 2017
    July 2017
    June 2017
    April 2017
    March 2017
    February 2017
    January 2017
    June 2016
    March 2016
    October 2015
    July 2015
    May 2015

    RSS Feed

Powered by Create your own unique website with customizable templates.
  • Home
  • Finishwork Galery
  • Finished Piece & U/P AR Sales
  • Blog
  • Winner's Circle
  • Commission pricing & policies
  • Contact Me
  • About Me
  • Thank You
  • Dictonary: Terms & Abbreviations
  • Wayne County Ohio Fair
  • John 3:16