As promised, here is the full account of how Rastus got his first layer of oils yesterday. As I said in an earlier post, I mix all of my paint in bulk so I don't have to mix a new batch every time I want to paint (it takes a hunk of time to do it!), thus I don't have any 'how-tos' on mixing paint for you. But I can describe it.
But first, remember how I said that Haffy blond does not follow my usual painting recipe? Usually in oil (or at least how I do it) you start with a layer of body color; it is the 'middle' color of your horse & fairly close to your base coat color. Then to the high points of the horse, such as the muscle masses, you add highlight; this is the brightest color of your horse. Then to the low points of your horse, such as muscle grooves, you add the shading; this is the darkest color of your horse beside any dark skin or black points such as on bay. With this in mind, I can shift up & down the 'scale' of color to do different shades & colors with a lot of the same paint. What is body for one horse may be shading for a lighter horse. What is body for another could be highlight for the darker colored horse. Does that make sense?
With that said, here is my composite palette for Rastus:
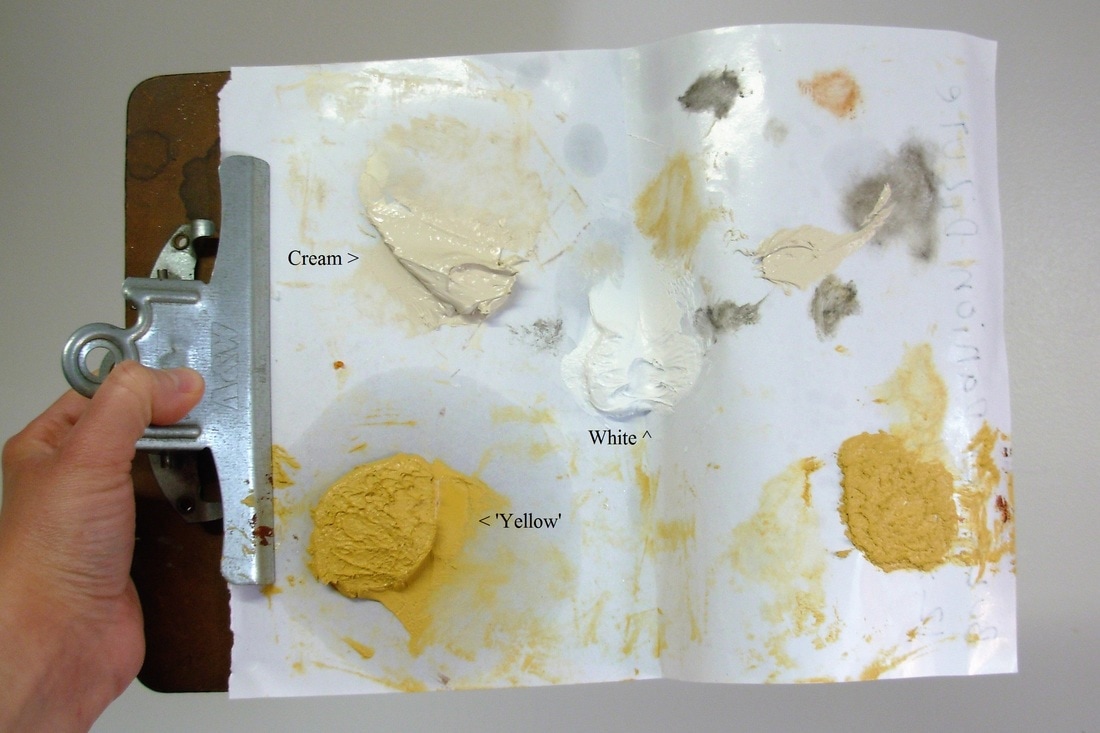
Above is my "companion dilute" mix; it is my highest 'scale' of color for painting 'reds' (which is a portion of buckskins, palominos, & duns). I use it with some of the colors from my "bay/red" mix (below) for the aforementioned colors.
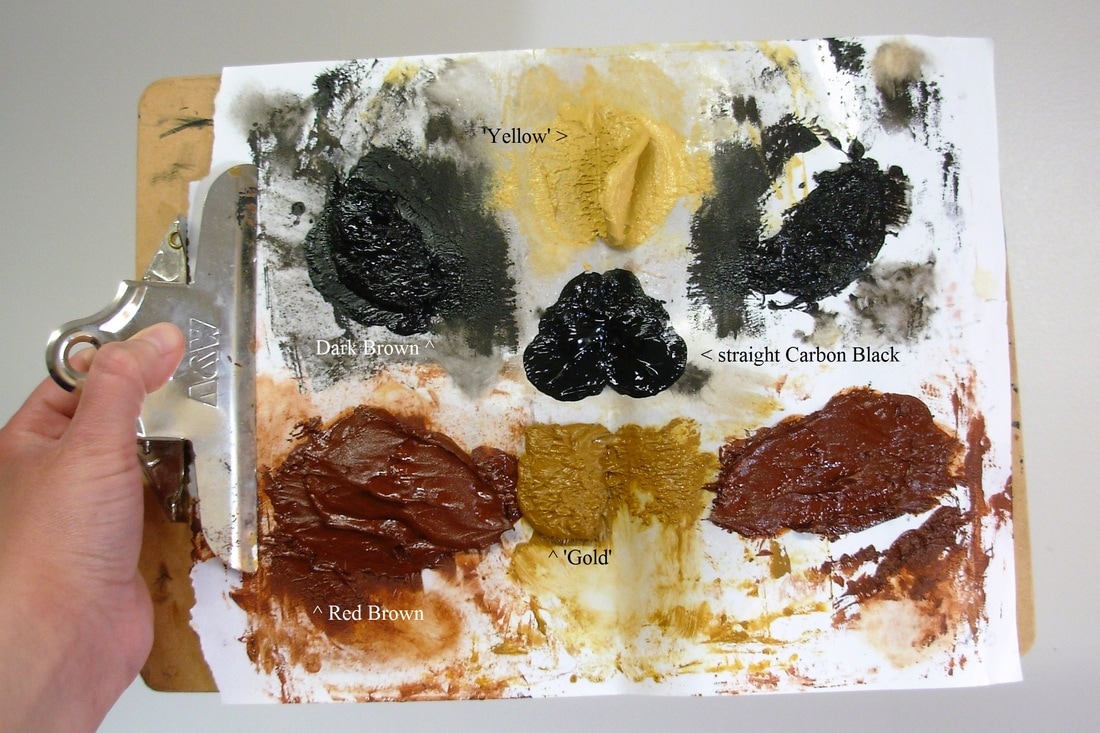
Now below is my "bay/red" mix. This is what I use for all but the occasional odd shades of bay & red, & also for golden palomino & buckskin. Most of the time the red brown is the body, the 'gold' is the highlight, & the dark brown is the shading, with the black for thin skinned areas & black points. With a little variation of the color of the base coat & amount of what color oils you put over it, you can get several different shades out of this. & similarly, by changing the color of the points on the exact same paint job you can get gold palomino or a red chestnut, or a liver chestnut or rich bay.
In most cases you start with whatever the middle color may be & work 'out' to light & dark. Then after the first layer of oils has dried, you can add more depth to it with either another light layer of the highlight & shading, or you can go darker with black for the shading or lighter with the 'yellow' for the highlight. It really does take a sense of learned intuition to a point to know what to do to get the result you are looking for. (Not what you wanted to hear, I'm sure!) I will have to post a session of painting a bay at some point to show how a 'normal' color goes!
As for mixing color, that would be a challenge to explain without doing it & taking pictures to illustrate. I will say that my brands of choice are Van Gogh & Masters Touch (the Hobby Lobby house brand). Colors vary from brand to brand, so I like having both around. I have also had one brand (Winton) that was very lurid in its colors & definitely affected my results. I avoid it, btw.
I only use six colors of oil: titanium white, carbon black, burnt umber, raw sienna, burnt sienna, & naples yellow, but for blacks I will add a couple & use some blues. I also add a good deal of Pearl-Ex powder, which is a metallic powder that adds shimmer to your coats. It also helps to dry the paint. Which leads me to the fact that I do not add any dryer or anything else to my paint. Honestly, they scare me. Have you read those bottles?? eap! It may take a day or two, but the paint does dry fine without it. Plus, I always wonder if my palettes would last as long (I pop the mixed paint in the freezer!) if it had dryer in it. I can use a bulk mix for more than half a year.
I only use six colors of oil: titanium white, carbon black, burnt umber, raw sienna, burnt sienna, & naples yellow, but for blacks I will add a couple & use some blues. I also add a good deal of Pearl-Ex powder, which is a metallic powder that adds shimmer to your coats. It also helps to dry the paint. Which leads me to the fact that I do not add any dryer or anything else to my paint. Honestly, they scare me. Have you read those bottles?? eap! It may take a day or two, but the paint does dry fine without it. Plus, I always wonder if my palettes would last as long (I pop the mixed paint in the freezer!) if it had dryer in it. I can use a bulk mix for more than half a year.
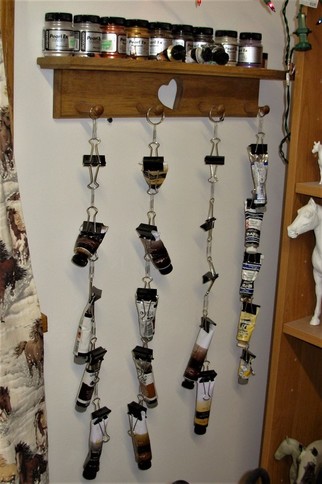
My various oil paints & Pearl-Ex colors.
TIP: Use binder clips to hang your oil tubes, they are MUCH more manageable that way!
TIP: Use binder clips to hang your oil tubes, they are MUCH more manageable that way!
I honestly can't remember what went into the mixes above, I did them a couple months ago, I can give a fair guess though: Red brown would be mostly or purely burnt sienna with antique bronze &/or aztec gold Pearl-Ex. Dark brown would be burnt umber with black & antique bronze & carbon black Pearl-Ex. Gold would be mostly or purely raw sienna with aztec gold Pearl-Ex. Black is carbon black & nothing else; with out Pearl-Ex it looks even more black (since it's not bouncing any more light). Both the yellows, though they are a little different, are naples yellow & white with aztec gold & micropearl Pearl-Ex (NOTE: I much prefer pearlwhite to micropearl for anything but I am having a hard time getting it.) White is white with micropearl Pearl-Ex. Cream... that one's going to be difficult to pinpoint. It is white with either a touch of burnt umber &/or antique bronze Pearl-Ex, but don't hold me to it.
All this is mixed with a palette knife on a sheet of palette paper, which is like super strength wax paper; you don't want anything that will soak up the oil in your paint, so don't use paper or even wax paper for your palette. Fold the paper in half & mix on one half & the crease only; then you can fold it over & put it in a ziploc in the freezer for keeping. (Make sure to write what the color is & when it was mixed on the paper.) Note: you don't need to worry about defrosting your oil before painting, it does not freeze solid & thaws out very quickly. Note number two: Use a clip board to hold your palette paper for easy use. You can even clip the other end to the board with a cloths pin or binder clip. I use mini hardware clips (those orange tipped 'industrial cloths pins!').
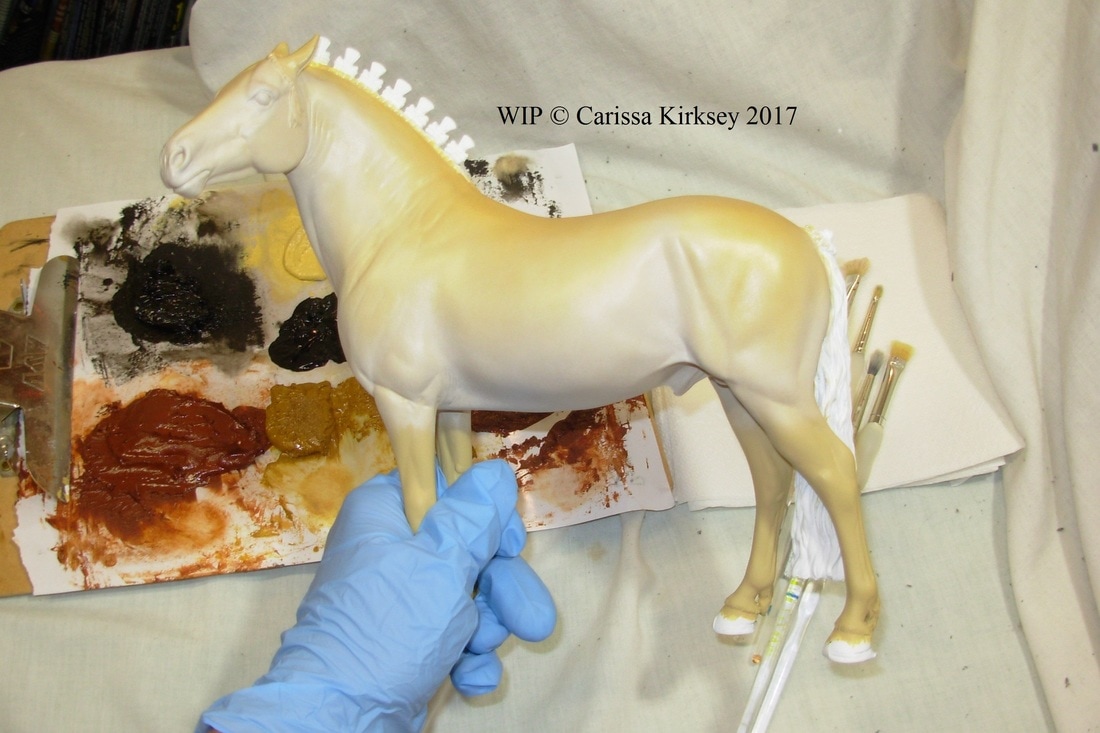
But anyway! Back to Rastus! HIS body color was the cream from the companion dilute mix.
I have quite an arsenal of brushes & some of them are well broke as you can see below! Unlike with acrylic, frizzy is an asset in oils! It is easier to blend colors once they get frizzy, but new ones do work.
All this is mixed with a palette knife on a sheet of palette paper, which is like super strength wax paper; you don't want anything that will soak up the oil in your paint, so don't use paper or even wax paper for your palette. Fold the paper in half & mix on one half & the crease only; then you can fold it over & put it in a ziploc in the freezer for keeping. (Make sure to write what the color is & when it was mixed on the paper.) Note: you don't need to worry about defrosting your oil before painting, it does not freeze solid & thaws out very quickly. Note number two: Use a clip board to hold your palette paper for easy use. You can even clip the other end to the board with a cloths pin or binder clip. I use mini hardware clips (those orange tipped 'industrial cloths pins!').
But anyway! Back to Rastus! HIS body color was the cream from the companion dilute mix.
I have quite an arsenal of brushes & some of them are well broke as you can see below! Unlike with acrylic, frizzy is an asset in oils! It is easier to blend colors once they get frizzy, but new ones do work.
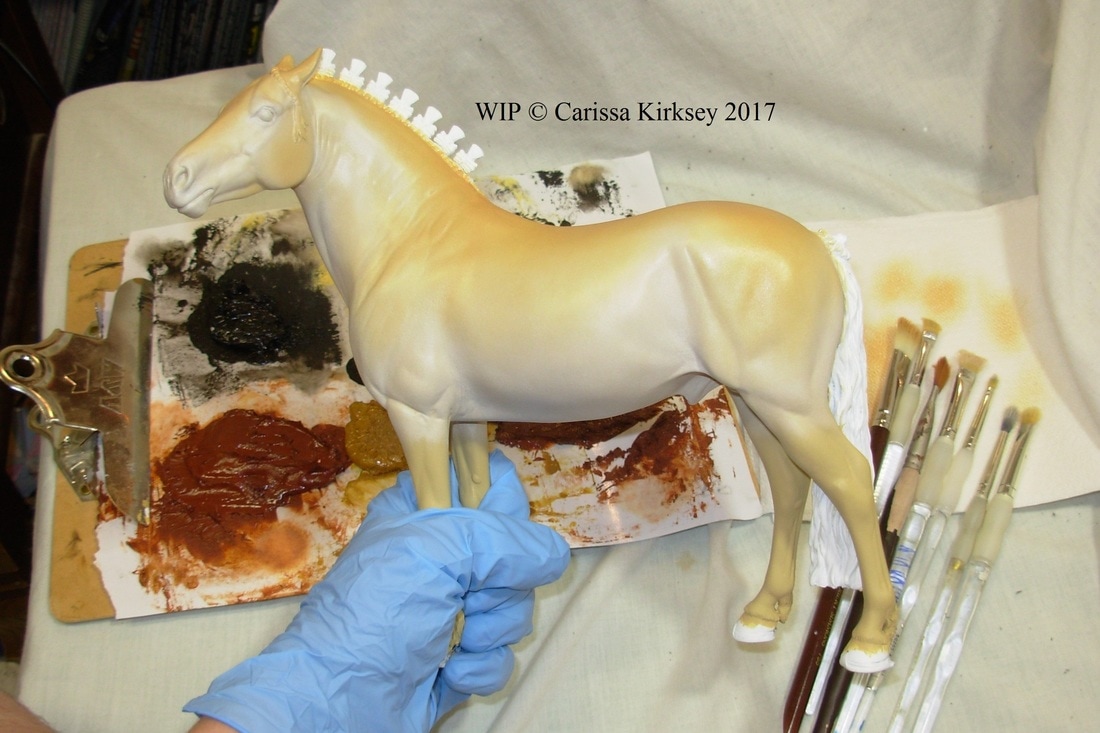
The name of the game with oil is THIN. & to clarify, I mean thin layers, NOT thinned paint. You do not want or need gobs of paint over your base coat, which is one of the reasons you should make an effort to mix your base close to the body color you are aiming for. You don't want to have to fight against the base color, this will lead to a thicker oil layer, & that is just trouble.
Start with the body color; I chose a well loved half inch once-was-flat. Touch just the tip of the brush in the oil color, work it in the brush on the pallet paper so that it is even on the brush, & then sort of scrub it onto the horse. You don't really stroke with oils, that just leads to streaky color as a result. You use the tip of the bristles, this is what frays out my brushes so splendidly.
Start with the body color; I chose a well loved half inch once-was-flat. Touch just the tip of the brush in the oil color, work it in the brush on the pallet paper so that it is even on the brush, & then sort of scrub it onto the horse. You don't really stroke with oils, that just leads to streaky color as a result. You use the tip of the bristles, this is what frays out my brushes so splendidly.
Work in sections so you always have a hand hold: start with the head, neck/chest (or combine those three), shoulders, forelegs, belly/groin/inner thighs/butt, barrel, hindquarters, & finally back legs. The tail is usually my last handle, but with Rastus's calm tail I have to use the legs, so they will be painted later.
A note on the glove: my hand gets sweaty as I work, which can make the base sticky, & that with all the handling can wear down the tooth of the base, so I wear a glove to protect the horse.
We're back to not following the recipe with Rastus: Usually I base whatever section I'm working on, highlight, shade, & move to the next section, so each sections is pretty much finished once I move to the next, but blond is a special case. I bodied the whole horse, then went back to highlight with the white mix. & again, I usually highlight all the high points, but with blond I did only his belly/groin/inner thighs/butt, lower barrel, flank, back of thighs, behind the elbow, chest, high points of the neck, muzzle, eyes, & high points of the face - excluding the cheeks. This was done with the same method of kind of stippling the paint on with the brush tip, using the two brushes below.
When you add highlight or shading, you are basically mixing paint ON the horse, which was a revelation that really did help my painting skills. You add the most (which is not much really) to where the color is brightest, & then feather it into the body color, in essence mixing the color more & more until it is indeterminable where one ends & the other begins. This is a skill, but trust me, you can learn it!
When you add highlight or shading, you are basically mixing paint ON the horse, which was a revelation that really did help my painting skills. You add the most (which is not much really) to where the color is brightest, & then feather it into the body color, in essence mixing the color more & more until it is indeterminable where one ends & the other begins. This is a skill, but trust me, you can learn it!
After adding the highlight, I added the shading in increments; building it up in strength starting with the gold mix & the same one inch flat that I used for the highlight (cleaned, of course!). Breaking the rules with shading the same as highlighting, I added the shading mostly like a 'blanket' over the top, covering his topline, down his hips, barrel, shoulder, & crest, & catching some of the low points of his neck. On his face I did down his nose- stopping just short of his muzzle, his cheeks, & lightly catching the low points, but avoiding his eyes. Being pangare or mealy, the muzzle & eyes will be light.
The shading was blended with the same stippling technique. After a couple go-overs with the gold, I took it up (or down?) a notch & added some red brown to the boldest colored areas. Even with the flash it's hard to see much difference between these two pictures, but trust me, in real life, there was. Also keep in mind that I will be building up dapples over this, so I don't want the base for the dapples too dark.
Last thing I did was add black to the thin skinned areas. Same technique used here, only smaller. I blended it in pretty well so that it is pretty much grey. Next layer I do will bring the darkest areas up to black. If you look at a pangare, the thin skinned areas fade out to grey pretty far, so this was what I aimed for as it is hard to fade to grey with a second coat.
Last of all, here is a group photo of what brushes I used:
Last of all, here is a group photo of what brushes I used:
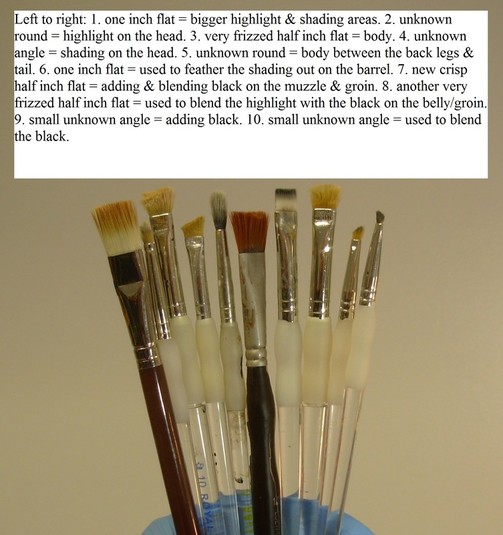
Sorry for the somewhat vague IDs here... I am not really up on my brush species. Also I tend to scrub off the printing on the clear-handled ones because if you hit that on the horse you get an instant & unfixable blue streak on your work! I can tell you that I mostly use synthetic bristles, but natural (sable?) brushes do make an appearance from time to time (that dark half inch flat).
Now for a moment on cleaning brushes. I don't use turpentine, it is nasty stuff & if any is left in your brush it will screw up your next painting session. I don't even use brush soap. What I do use? Dish soap & warm water under the tap! Works just fine! I have also used saddle soap which works just as well. If you're tired after painting & want to cheat, put your brushes in the freezer, that'll buy you some time. & in the event you accidentally fossilize a brush, get some cheap canola oil from the grocery, put a little in a jam jar, & soak the bristles of your brush for a few hours or a day & wash out as usual (wash it well though as any left up in the brush can thin out your paint while you're working).
Now for the finale, a couple slightly better pictures of Rastus. :)
Now for the finale, a couple slightly better pictures of Rastus. :)
Chillin' in the China cupboard!
TIP: I will sometimes carefully put a drying horse under a CLEAN plastic bag to help keep any dust off.
TIP: I will sometimes carefully put a drying horse under a CLEAN plastic bag to help keep any dust off.
As of today, his shading is dry, but his highlight is not. In a day or two I will be able to give him a layer of finish & continue working on him!
Until then, happy NaMoPaiMo all!
Until then, happy NaMoPaiMo all!
 RSS Feed
